Ethereum DApp with EVM, Remix, GoLang, Truffle, Drizzle and Solidity-Part 2
Recap
If you are new to blockchain technology, reading the below articles in advance is highly recommended:
- A beginner Guide to Blockchain Technology
- How Decentralized Peer-To-Peer Network Works
- How blocks are added to the blockchain
- How Public and Private Keys of Cryptography Work
- What Is A Cryptographic Hash Function
- How Digital Signature Works In Blockchain
- The role and types of consensus mechanism in blockchain
Note
If you are new to the blockchain technology, taking our Introduction to Blockchain Technology self-paced course in YouTube is highly recommended. Also, for a comprehensive coverage of blockchain development in Ethereum or mastering Solidity programming, taking our below self paced courses is highly recommended:
Source Codes
Click here to download complete source code for this tutorial.
Outline
For those who are not familiar with blockchain technology reading History and Evolution of Blockchain Technology from Bitcoin article is strongly recommended. Also, if you wish to learn and practice Hyperledger blockchain development, visit Comprehensive Hyperledger Training Tutorials page to get the outline of our Hyperledger tutorial articles.
We have written two sets of tutorials to explore Ethereum and Solidity programming in depth. First set covers the following nine recipes:
- Introduction to Ethereum Blockchain Development with DApps and Ethereum VM
- Building Auction DApp With Ethereum and Solidity Programming Language
- Working with Ethereum Blockchain Applications through Remix IDE
- Building Bidding Form in Web3js for Ethereum Auction DApp
- Working with web3js API and JSON to Build Ethereum Blockchain Applications
- Deployment Environments for Managing Ethereum Smart Contracts
- Work with Ethereum Private Network with Golang with Geth
- Compiling and Deploying Ethereum Contracts Using Solidity Compiler
- Running Ethereum Auction DApp and Solidity Tips
In short, you learn about how to set up and configure Ethereum and develop blockchain applications using Solidity programming language. We explore its key components, including smart contracts and Web3.JS API via an Auction Decentralized Application (DApp) step-by-step.
In second set, we will discuss more advance topics in Ethereum blockchain development and solidity while building a Tontine DApp game step-by-step. Specifically, we cover Truffle and Drizzle. For instance, we show you how a tool such as Truffle can be an assistant in building, testing, debugging, and deploying DApps. In summary, we are going to cover four main topics:
- Exploring the Truffle suite
- Learning Solidity's advanced features
- Contract testing and debugging
- Building a user interface using Drizzle
The 2nd set consists of 8 recipes as follows:
- Install Truffle and Setup Ganache for Compiling Ethereum Smart Contracts for Tontine DApp Game
- Run Tontine Ethereum DApp Game Contract
- Design Tontine Ethereum DApp Game Interfaces
- Contract Interactions between Ethereum and Solidity via Tontine DApp Game
- Work with Truffle Unit Testing in Tontine DApp Game
- Debugging with Truffle and Ethereum Remix in Tontine DApp Game
- Building Frontend Application for Tontine DApp Game with Drizzle
- Running and Playing Tontine Ethereum DApp Game
IMPORTANT: Understanding and completing the first set of recipes are required prior to working on second set of recipes.
Definitive Guide on Ethereum Tools
We gather together a definitive guide to all available tools, components, frameworks, and platforms for developing applications on Ethereum. This is a MUST for all serious Ethereum developers. Visit the below link to read the article and feel free to share it in your network.
https://myhsts.org/blog/ultimate-guide-to-ethereum-developer-tools.html
#1 Install Truffle and Setup Ganache for Compiling Ethereum Smart Contracts for Tontine DApp Game
In our first round of recipes, we learned a lot about the Ethereum ecosystem, but we are yet to realize the full potential of its different components. More precisely, we explored how Ethereum works, what a decentralized application (DApp) is and how to build one, and also covered the key concepts of Solidity and web3.js. We then introduced some of the most common smart contract design patterns (withdrawal from a contract, restricting access, state machines), before ending with a discussion of a contract’s cost optimization.
To brush up your knowledge and skills, on second round of recipes, we are going to build a Tontine DApp game. We will exploit this example to explore new tools that are going to change the way you build DApps, and introduce new Solidity features.
In this walkthrough, we will discover how a tool such as Truffle can aid in building, testing, debugging, and deploying our DApp.
Tontine Game Overview
Before starting the project, let me introduce the concept behind the game.
As this recipe’s name suggests, we are going to build a Tontine game. The concept behind the weird word Tontine appeared at the end of 17th century. Initially, it represented a collective investment scheme plan, where each participant paid a sum into a fund and received dividends from the invested capital. But behind this simple idea, a weird rule is hidden: when a subscriber dies, their share is divided among the others and the last lucky survivor recovers the whole capital.
In our game, we will adapt this idea to our smart contract and gaming logic. Players will deposit funds in the game's smart contract to join the game. Afterwards, they should keep pinging it during a specific time interval to avoid being knocked out by other opponents. For instance, if anybody misses pinging the contract within a day for any reason, the other players are able to eliminate them. So, nobody will die in our case but they will be eliminated. Similar to the original Tontine, the last player standing will win the funds controlled by the contract.
Let's start by preparing the environment in which we'll build the Tontine smart contract.
Prerequisites
Before proceeding with this recipe, you should already be familiar with developing in Solidity. If not, I recommend reading our first round of recipes. Moreover, the following prerequisites should be installed:
• Ubuntu 16.04
• MetaMask browser
• Plugin Node.js and NPM
Truffle quick start
So far, the only method we have used to compile and interact with our contracts was Remix. Let me now introduce you to a new DApp development toolkit: Truffle.
Truffle is the most popular development environment and testing framework for DApp developers. It is a true Swiss Army knife that helps you easily compile, test, and deploy your contracts to the blockchain. Moreover, Truffle helps you set up and hook your frontend up to your deployed contracts. It also has other features:
- Built-in smart-contract compilation, linking, deployment, and binary management
- Automated contract testing
- Scriptable, extensible deployment and migrations framework
- Network management for deploying to any number of public and private networks
- Interactive console for direct contract communication
Installing Truffle
To start using Truffle, you can install the latest release using Node Package Manager
(NPM): npm install -g truffle.
You can also choose a specific version to install, such as npm install -g truffle@4.0.4.
Once installed, you can check your Truffle version in the Terminal using truffle version:

By typing truffle into your Terminal without any arguments, you’ll get all of Truffle's available options. If you are unsure about something, or you want to learn about an option, have a look at the documentation: http://truffleframework.com/docs.
Saying hello to Truffle
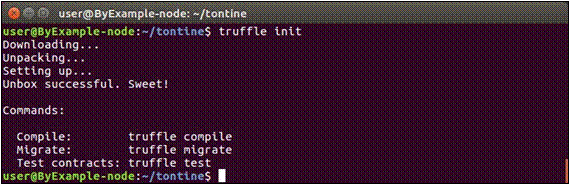
Now, Truffle is ready. Start by creating a folder called tontine/ for this first project, then initialize it with Truffle as follows:
mkdir tontine cd tontine truffle init
Within a few seconds, this last command will download a template of a Truffle project for you:
Once the initialization is completed, you'll get the following files and directory structure:
- contracts/: A directory that houses all Solidity contracts.
- migrations/: A directory that hosts JavaScript migration files that helps in deploying our contracts to the network.
- test/: A directory holding test scripts for testing your contracts.
- truffle.js: Truffle's configuration file, used to define project-related settings. truffle-config.js is a copy of truffle.js used to ensure compatibility with Windows. Feel free to delete it when you are under Linux.
- Contracts/Migrations.sol: A separate Solidity file that manages and updates the status of your deployed smart contracts. This file comes with every Truffle project and is usually not edited.
- Migrations/1_initial_migration.js: A migration file for the Migrations.sol contract. You can create new migrations with increasing numbered prefixes to deploy other contracts.
Running Truffle for the first time
To examine how we can compile and deploy a contract using Truffle, we will use a simple introductory example. We will use the hello world example we built in our previous round of recipes or Peer-to-Peer Auctions in Ethereum. Copy the contract code into a hello.sol file and put it into Truffle’s contracts/ folder.
Let's see how can we use Truffle to compile and deploy this first contract.
Preparing the migration
Truffle uses the migration concept to refer to deploying and switching old contracts to new instances. To deploy our hello world contract, we need to indicate to Truffle how to deploy (migrate) it into the blockchain. To achieve that, open the migrations/ folder and create a new migration file named 2_initial_migration.js.
Paste the following content into this migration file :
const Hello = artifacts.require("HelloWorld"); module.exports =  function(deployer) {

    deployer.deploy(Hello);

    };
At the beginning of the migration, we tell Truffle which contracts we would like to interact with via the artifacts.require() method, in the same way we do with require in Node.js.
In the case where you have multiple contracts defined, you'll need to define an
artifacts.require() statement for each contract:
var ContractOne = artifacts.require("ContractOne"); var ContractTwo = artifacts.require("ContractTwo");
Configuring Truffle
Now, it is time to configure Truffle. First, we need to define the networks to which we want to migrate the contracts. In the truffle.js file (truffle-config.js for Windows), insert the following code:
module.exports = { networks: {

    my_ganache: {

    host: "127.0.0.1",

    port: 7545, network_id: "*"

    }

    }

    };
We define a deployment network with the name my_ganache along with a few parameters. The network name is used for user-interface purposes, to help you easily choose to run your migrations on a specific network with a name, as we can configure Truffle to use multiple networks.
Basically, this configuration file says to Truffle that when we choose the my_ganache network, connect to the host at 127.0.0.1, using port 7545. For network_id, we used * to match any network ID. Beyond that, there are many other configuration options, such as gas limit and gas price, which are detailed in the documentation: https:// truffleframework.com/docs/truffle/reference/configuration.
Compiling the contract
Now, it's time to compile and deploy the hello world contract. Start by running the
truffle compile command in your console.
After a short while, you will get the compilation result. You may notice the message indicating that artifacts are saved in the default build folder, ./build/contracts:

If you go there, you will find a JSON file (the artifacts) created by the compilation with details about your contract (ABI, bytecode, and so on).
As Truffle hasn't complained about any errors, you can move forward and deploy your contract. In other cases, you might get warning messages that you can safely ignore, or adjust your code accordingly.
Migrating the contract
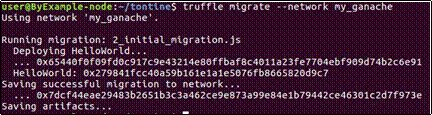
We have now compiled our contract and configured Truffle to deploy the bytecode into the local blockchain network called my_ganache. To specify the deployment network, we need to run Truffle with the --network option, as follows: truffle migrate --network my_ganache.
It won’t connect unless you start the my_ganache network, right? This is what we will configure in the next step.
Setting up Ganache
If you remember, in the previous chapter,Peer-to-Peer Auctions in Ethereum, we introduced Ganache as a virtual blockchain for local testing. This tool is available under two formats:
- Ganache CLI (previously known as TestRPC)
- GUI version (we used it in the previous chapter)
In this recipe, we will use ganache-cli. Hence, install Ganache CLI globally using NPM, as follows:
npm install -g ganache-cli
Once installed, open a separate command line or tab and type in the following command:
ganache-cli -p 7545
As you may have guessed, the -p option specifies which port to listen on as Ganache CLI runs by default on 8545 (the same as Geth). If you are unsure about an option, refer to Ganache's GitHub page (https://github.com/trufflesuite/ganache-cli) where you can find ample information.
When Ganache starts up, it generates 10 accounts (unlocked) preloaded with a balance of 100 ether each, and displays their Ethereum addresses and the corresponding private keys, as shown in the following picture:
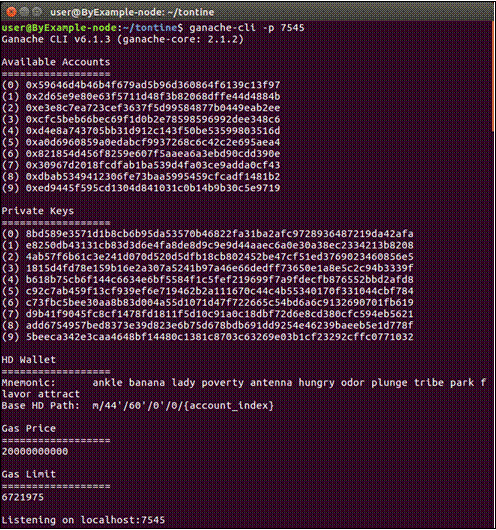
These accounts will be very helpful to build raw transactions or import the created accounts later.
After this step, you can deploy the contract by running the truffle migrate --network my_ganache migration command.
After the successful execution of the deployment script, Truffle will output the
HelloWorld contract's address, as depicted here:
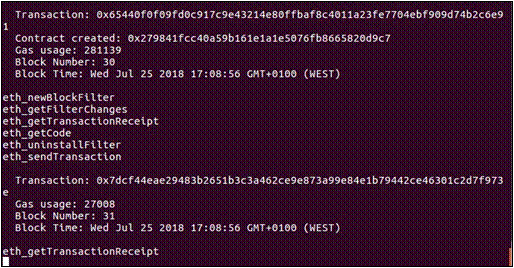
At the same time, in Ganache's output, you should see the deployment transaction details, as shown in the following screenshot:
You have now set up the necessary development and deployment environment to build a DApp, and learned how to compile and deploy a given contract into Truffle.
Next, we move on to the most exciting part: building the game. Let's start from the smart contract side.
#2 Run Tontine DApp Game Contract
Recap
- Install Truffle and Setup Ganache for Compiling Ethereum Smart Contracts for Tontine DApp Game
- Run Tontine Ethereum DApp Game Contract
- Design Tontine Ethereum DApp Game Interfaces
- Contract Interactions between Ethereum and Solidity via Tontine DApp Game
- Work with Truffle Unit Testing in Tontine DApp Game
- Debugging with Truffle and Ethereum Remix in Tontine DApp Game
- Building Frontend Application for Tontine DApp Game with Drizzle
- Running and Playing Tontine Ethereum DApp Game
As stated in the previous recipe, Tontine is a competitive multiplayer game. When it starts, players pool their money into the Tontine contract, and once the game is over, all the funds are handed to the last surviving participant. Meanwhile, players take turns trying to stabilize their position and eliminate their opponents. The main rules of our Tontine game are as follows:
- A player can join the game by paying at least 1 ETH to the contract. The game starts when the first player enters.
- The player needs to ping the contract every day.
- If the player hasn't pinged the contract during the last 24 hours, other users can eliminate them.
- The last player will get all the money out of the contract and the game ends.
General structure
Technically speaking, unlike a traditional online game, which has all of its business logic defined and executed on a private server owned by a company, our game's business logic is defined and executed in a smart contract on the decentralized Ethereum blockchain.
In our design, we will define two main contracts with a single interface. This wouldn't be the best approach out there, but I designed it as such to make it easier to discover new Solidity features, such as interfaces, contract interactions, and overloading. It's worth mentioning that for the purpose of removing complexities and to help learn advanced Solidity features, optimization and security are intentionally not considered.
We will separate the function declarations from their definitions by using an interface instead of an abstract contract. Obviously, you don't have to create an interface or abstract class for each contract you build, but we are adopting this pattern for learning purposes to show you that such a well-known pattern in Object-Oriented Programming is applicable in Solidity as well.
UML model
For building this game, we will adopt the following straightforward UML diagram:
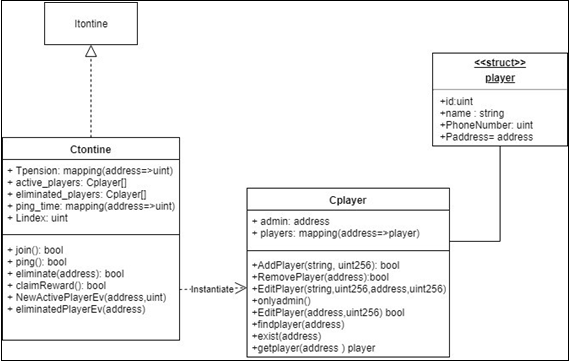
So far, we have three main components:
- Itontine: Interface for Tontine game functions
- Cplayer: A class for managing players (enrollment, modification, and so on)
- Ctontine: A contract for implementing Tontine game functions
As you'll notice, the interface name starts with an I prefix, whereas contracts starts with a C prefix.
Preparing the contracts
All our code will be hosted in a single Solidity file, so first create an empty file called
tontine.sol in Truffle’s contracts/ folder using touch contracts/tontine.sol.
Cplayer as a CRUD contract
We'll start by building the Cplayer contract, which is responsible for managing player accounts. Going forward, we will use Solidity to build it as a CRUD smart contract.
As you know, the CRUD paradigm is common in constructing web applications as its operations generally constitute the fundamental structure. In fact, the CRUD acronym's create, read, update and delete operations represent the basic operation we'll need to perform on the data repository (Smart contract storage) while managing the players.
At this point, to build a CRUD contract, we first need to understand where and how data is stored and accessed in Ethereum's blockchain.
Smart contract data location
Although each smart contract has its own separate storage space, we do not decouple the storage-layer code from the other layers of the application as we do in classical development methods. Therefore, there is no querying language, such as SQL, or separated database component, but the smart contract through its code provides the ability to initiate permanent states, and read or store data.
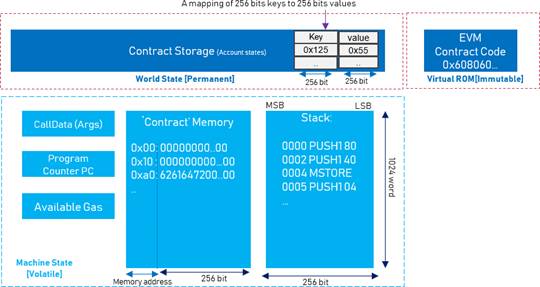
The smart contract is executed in the EVM to update the system state. This virtual machine provides dedicated storage, which is a persistent associative map where the contract stores states (permanent data). It also provides volatile memory to hold transient data while a contract is being executed. On the other hand, the contract's bytecode (encoded sequence of opcodes) is stored separately, in a virtual ROM. The following figure illustrates a simplified architecture of the EVM and its interactions with the blockchain:
We learned in the previous recipes, Peer-to-Peer Auctions in Ethereum that a contract has state variables (we call them the contract's state) similar to global variables (defined in the contract scope) that are located by default in permanent storage.
There are also default locations depending on which type of variable it concerns:
- Function arguments (in CALLDATA) and their return values are in memory by default.
- Local variables of the struct, array, and mapping types reference storage by default.
- Local variables of normal types ( such as uint and bool) are stored in memory.
The following picture presents the default locations for different elements in a smart contract (storage in red, memory in green) :
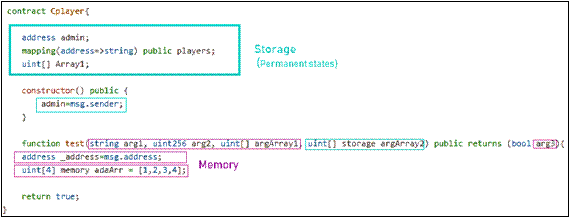
Depending on the context, you can use dedicated memory or storage keywords to change the data location. These locations are important to determine how an assignment is performed. In general, assignments between storage and memory variables, and also to a state variable, are passed by value. However, assignments to local storage variables (arrays or structs declared within the function scope) pass the state's value by reference.
The CRUD data repository
As our main data repository, we will use a mapping structure to index all enrolled players using their address. If you remember, in the previous recipes, Peer-to-Peer Auctions in Ethereum we learned that a mapping is similar to a big key-value database with all possible key values filled with zeros.
In the tontine.sol file, add the following code:
pragma solidity ^0.4.24;contract Cplayer{ struct player{
string name;
uint PhoneNumber; address Paddress; uint id;
}
mapping(address => player) players;
}
The code is pretty self-explanatory: we declare a new type called player, which is a structure (struct) that represents a user’s details.
We also declare a players mapping to store the users' details. In the mapping definition (key ≥ value), the key (which acts like a unique ID) can be almost any type, except for a mapping, a dynamically sized array, a contract, an enum, or a struct. The corresponding value can actually be any type, including a mapping.
It’s magic that the data storage is fully managed by a single line of code. In our case, declaring a mapping in the code is enough to store players. We don’t have to create a database or table or install a database driver.
To give you an idea, the previous Solidity code is similar to creating a table in SQL:
CREATE TABLE players (`address` varchar(32) NOT NULL, PRIMARY KEY (`address`) …);
Generally, in a standard RDBMS, you define a unique key as an incremental integer, whereas for a mapping, the uniqueness is ensured by the collision-resistance property of sha256 used to manage the keys, therefore two different keys can’t have the same hash.
CRUD – Create
Great, now that our storage is initiated, let’s define the first CRUD operation.
The CREATE operation represents adding new entries to our persistent storage structure (player mapping). To insert a new player, we will define an addPlayer method, as follows:
    function addPlayer(string _name, uint256 _phonenumber) public returns  (bool) {

    players[msg.sender].name = _name; players[msg.sender].Paddress =  msg.sender; players[msg.sender].PhoneNumber = _phonenumber; return true;

  }
This function enables a new player to enroll themselves in the players, database. Similar to an INSERT statement, the different assignments will create (or, more accurately, fill) a new record in the mapping, indexed using the player address. By analogy, in SQL we can do the same thing using insert into players values (_name, _msg. sender, _phonenumber);.
CRUD – Read
In the CRUD pattern, the READ operation expresses the action of retrieving, searching, or viewing existing entries. Correspondingly, we define the findPlayer method in the Cplayer contract to read the mapping records based on the primary key (player address) specified as an argument:
function findPlayer(address _address) public view returns (string, uint,  address) {

    return (players[_address].name,  players[_address].PhoneNumber, players[_address].Paddress);

    }
This simple, magical function will directly access a player's details, by providing only its address without the need of looping through the mapping. Moreover, as you may have noticed, Solidity enables us to return multiple values for a function.
Similarly, if we suppose that the players mapping is a table with three columns, then the findPlayer method will be similar to performing the following SQL request:
Select * from players where Paddress=_address;
Remember, you can define the mapping as public to retrieve the player information directly without using a find method.
Furthermore, we can check the existence of an element in the mapping by defining the following function:
function exist(address _address) public  view returns (bool) { return (players[_address].Paddress != 0x0);

    }
The preceding method will read and check whether the player address is not null (not zero), as mappings are initialized to zero for each possible key/value. In Solidity, the null statement is not defined.
Furthermore, to retrieve a player as a compact structure object, instead of returning a tuple of values, we use the following method:
function getplayer(address _adress) public  view returns (player) { return players[_adress];

    }
However, Solidity, at the time of writing this recipe, doesn’t allow us to return struct objects from a function unless you are using a compiler newer than 0.4.16. In this case, you will need to activate the new ABI decoder, which is still an experimental feature, by adding the pragma experimental ABIEncoderV2; directive.
Why's that? Because Solidity doesn't recognize structs as real objects, therefore standard ABI doesn't support them.
At the time of writing, passing structs between contracts isn't a good idea. Nevertheless, I have chosen this pattern knowing that in the future, Solidity compilers will provide full support for this feature. You can instead use an unpacker method to return the struct elements, such as findPlayer. If you plan to deploy your contract to the Mainnet, think of removing the experimental features, such as ABIEncoderV2, to avoid any malfunctioning.
Mapping iterations
While we are talking about search logic, let me open a parenthesis about mappings to answer a recurring question.
Are mappings iterable? The answer is no, they aren’t.
Currently Solidity doesn’t support iterating a mapping, as they don’t have a fixed length (number of non-null key-values entries). However, you can use an auxiliary array and structure in which you store the keys to your mapping to tie each element to its key. Using this pattern, the IterableMapping library was built by Solidity developers to iterate over the mapping keys. Its code is available in the following GitHub repository: https:// github.com/ethereum/dapp-bin/blob/master/library/iterable_mapping.sol.
CRUD – Update
Next up, we’re going to perform entry updates. As its name suggests, the update operation in CRUD performs an update or edit to existing entries in our players' mapping storage.
Our update method will be editPlayer() , which enables the players themselves to edit
their own details by sending a transaction to the Cplayer contract. Here’s the code for
editPlayer() and the logic  for editing individual contacts:

    function  editPlayer(string _name, uint256 _phonenumber, address

    _address,uint256 _id) public returns (bool)  { players[msg.sender].name = _name; players[msg.sender].PhoneNumber =  _phonenumber; players[msg.sender].Paddress = _address; players[msg.sender].id =  _id;

    return true;

    }
As every user has their details mapped to their address (ID), we need only to target the ID in the mapping and update the attribute of the corresponding struct.
Again, let's make a point about immutability in Ethereum.
Every time you update a new entry, you don’t erase or override the old value. When you update a contract's state, you define a new value that will be included in the current block (on the blockchain), but the old value will still be living in a previous block. This is similar to Lavoisier's law: nothing is lost, everything is transformed.
In SQL, we can do the same thing using an UPDATE statement on the players, table based on the primary key for a record specified in the WHERE clause:
 UPDATE players

    SET name = name,... WHERE ID  = msg.sender;
However, unlike in SQL, you can’t alter an existing mapping as you do for tables. The code is definitively immutable.
Function overloading
As for other languages, Solidity has the ability to define different semantics for a function using different types and numbers of arguments. The following example shows the overloading of the editPlayer function:
  function editPlayer(address  _address,uint256 _id) public returns (bool) { players[_address].id = _id;

  return true;

  }
This is essentially the same as the EditPlayer function we defined before, the difference being it will edit only the player's ID attribute. This overloaded function will be executed if EditPlayer is called with two arguments (string and uint256).
CRUD – Delete
So far, we have implemented three of the main CRUD operations. Now it’s time to define the last, the DELETE operation, to deactivate or remove existing entries. To achieve that, we define the following removePlayer() method:
modifier onlyadmin(){ require(msg.sender ==  admin);

  _;

  }
function removePlayer(address _address)  public onlyadmin returns (bool) { delete players[_address];

  return true;

  }
removePlayer() will remove an element (player) at a specific index (address). Solidity provides the delete operator to reset deleted elements to the default value. In the mapping, the corresponding value to the specified key (address) will be set to zero, and the mapping structure will remain the same.
Moreover, we can apply delete to a given array member as Delete MyArray[3]. This implies that the value of MyArray[3] will equal zero without reducing the array length. If we want to physically remove the element with reindexing, we need to delete it and manually resize the array. Deleting elements in Solidity behaves like an update with the initial value for the type.
The equivalent SQL statement to the previous function would be DELETE from players where address=_address;.
You might be wondering about deleting the mapping as we do in SQL for a table: DROP TABLE players;
This is currently impossible for a mapping, but it's possible to delete a dynamic array or a structure.
One last thing to mention: in your CRUD contract, you can manage contract roles and permissions using modifiers. For example, we can define fixed roles and assign permissions based on specific attributes (owner, and player) to control access to specific functions (actions).
At this point, we have accomplished the goal of this first section. We have built our Cplayer contract following a CRUD pattern. Now, let's move on to the next recipe by building the Ctontine contract while creating an Itontine interface.
#3 Design Tontine DApp Game Interfaces
Recap
- Install Truffle and Setup Ganache for Compiling Ethereum Smart Contracts for Tontine DApp Game
- Run Tontine Ethereum DApp Game Contract
- Design Tontine Ethereum DApp Game Interfaces
- Contract Interactions between Ethereum and Solidity via Tontine DApp Game
- Work with Truffle Unit Testing in Tontine DApp Game
- Debugging with Truffle and Ethereum Remix in Tontine DApp Game
- Building Frontend Application for Tontine DApp Game with Drizzle
- Running and Playing Tontine Ethereum DApp Game
As per our design, now we will define an interface for our Tontine game.
Interfaces are universal concepts in programming languages used to represent collections of abstract methods. They are useful since they implement an agreed set of functions that enable interactions without forcing a contract relationship (they might be considered as a protocol).
Nevertheless, in Solidity, unlike abstract contracts, interfaces present the following limitations:
- Cannot inherit other contracts or interfaces
- Cannot implement their own functions
- Cannot define a constructor
- Cannot define variables
- Cannot define structs
- Cannot define enums
Here is the definition of our Itontine interface:
 interface  Itontine {

    function join() external payable returns (bool); function ping() external  returns (bool);

    function eliminate(address a) external returns (bool); function  claimReward() external returns (bool);

    event NewActivePlayerEv(address _address, uint time); event  EliminatedPlayerEv(address _address);

    }
As you can see, we define an interface in the same way as we do for an abstract contract, the difference being the use of the interface keyword. Let's have a look at what these methods are for:
- join() enables players to join the ongoing Tontine game. It's declared as payable, which means it can receive ether.
- ping() keeps a track record of the player activity (pinging).
- eliminate() enables players to knock out inactive players. claimReward() sends the total amount controlled by the contract to the last surviving player.
- NewActivePlayerEv and EliminatedPlayerEv are two events emitted when a new player joins the game or a player is eliminated, respectively.
The most important benefit of using interfaces is making the main smart contract upgradeable. Such design can facilitate rolling out future releases of the Tontine game (Ctontine) without introducing breaking changes.
At this point, we need to build out the implementation part.
Interface implementation – Ctontine contract
The next step is to define the main contract behind our game: Ctontine. In Solidity, when a contract implements an interface, the class agrees to implement all of its methods. Hence, if you miss implementing a function defined in the inherited interface, you’ll get the following error (in Remix):

As we do for inheritance, we use the is keyword to implement the interface, as follows:
contract Ctontine is Itontine {..}
Now, let's fill this empty contract. Within the preceding bracket, we start by declaring the following contract states:
mapping (address => uint256 ) public Tpension; Cplayer.player[] public  active_players; Cplayer.player[] public eleminated_players; mapping (address  => uint) public ping_time; uint256 public Lindex;

    Cplayer Tplayer:
Here are the contract states:
- Tpension: This is a mapping object storing the funds deposited by each player.
- active_players: This is an array of active players.
- eliminated_players: This is an array of eliminated players.
- ping_time: This is a mapping storing the last ping time for each player.
- Lindex: This is an integer variable tracking the index of the last active user.
We will deal with an instance of the Cplayer contract and Cplayer.player objects to represent the players managed by the aforementioned contract. Therefore, we should find out how to access the remote states and call methods from a remote contract.
#4 Contract Interactions between Ethereum and Solidity via Tontine DApp Game
Recap
- Install Truffle and Setup Ganache for Compiling Ethereum Smart Contracts for Tontine DApp Game
- Run Tontine Ethereum DApp Game Contract
- Design Tontine Ethereum DApp Game Interfaces
- Contract Interactions between Ethereum and Solidity via Tontine DApp Game
- Work with Truffle Unit Testing in Tontine DApp Game
- Debugging with Truffle and Ethereum Remix in Tontine DApp Game
- Building Frontend Application for Tontine DApp Game with Drizzle
- Running and Playing Tontine Ethereum DApp Game
Smart contract interaction
In Ethereum, contracts communicate between each other using message calls. Practically, a smart contract is able to communicate with another one that it deploys or with an instance of an existing contract. In Solidity, for both cases, we can declare a Cplayer instance as follows: Cplayer Tplayer. Let's discuss how contracts interact between Ethereum and Solidity.
Contract instantiation
To instantiate an existing contract, we need to know its address. For example, in our contract, we will instantiate the Cplayer contract in the Ctontine constructor as follows:
    constructor(address _CplayerAddress) public  { Tplayer = Cplayer(_CplayerAddress);

    }
The Cplayer(_CplayerAddress); expression will perform an explicit conversion of the Cplayer type, stating that "we know that the contract at the given address of _CplayerAddress is of the Cplayer type." It's worth noting that instantiating a contract using its address doesn’t imply the execution of its constructor.
The interaction with a deployed contract is a very powerful feature as it allows code reusability, since deployed contracts can be used like libraries. Furthermore, if we implement a pattern that enables us to change the used contract, instantiation can help us avoid reusing faulty contracts by changing the contract address.
Contract creation
The second option is to deploy a new instance of a given contract. To achieve that, Solidity provides the new keyword, which can be used as follows:
contract ContractA { uint256 x;
  function ContractA (uint256 y) payable { x  = y;

    }

    }
  contract  ContractB {

    ContractA  CAinstance = new ContractA(10);

    }
As you can see, we can pass arguments when we create a contract, since the created contract has a constructor that accepts arguments. The new ContractA(arg) line will execute the created contract's constructor and return its address. Note that an instance of each smart contract is implicitly convertible to its address, and in Solidity we are not dealing with real objects as in OOP to represent contracts as we do for classes.
Moreover, you can send ether from your source contract to the newly created contract using the .value() option, as follows:
ContractA CAinstance = (new ContractA).value(amount)(arg);
Once the instance is created, the caller contract can pass messages to call remote methods or to read or edit remote states. Let’s see how to perform such calls.
Reading the storage of a remote contract
In our project, we have a Ctontine contract that instantiates a Cplayer object. As we presented in the game design, the player should sign up using the Cplayer contract, and then join the game using the Ctontine contract. This implies that the Cplayer contract manages the player details and that Ctontine needs to access them.
In Ethereum, each contract has its own storage space, which can’t be accessed directly or overridden by another contract. Given the ContractA and ContractB contracts, the former can only access the storage of the latter by invoking a method (getter) that returns data from the storage of ContractB.
You might be wondering, "What if we declare states variables as public? Wouldn’t they be accessible?" It's not important whether the variable is public or not, as the public specifier provides a free getter function within the contract scope, and not external access.
Back in our contract code, if we try to read the admin variable in the Ctontine contract from the Cplayer contract directly – Address Cplayer_admin = Tplayer.admin; – we’ll get the following message error, even if admin is declared as public:

So how do we solve this?
In the target contract, we should have a getter that reads for us and returns the intended value.
Editing the storage of a remote contract
As was the case for reading contract storage, you cannot modify states of another contract without defining a setter function.
Let’s have a look at the following example:
contract ContractA { uint256 public state;

    function setstate(uint _value) { state =  _value;

    }

    }
  contract  ContractB{

    ContractA public OneInstance = new ContractA(); function getstateA()  public {

    OneInstance.state = 12; OneInstance.setstate(12);

    }

    }
The OneInstance.state = 12; line in the getstateA method will raise an error. We need instead to call the setstate() setter to update the state value.
The need for getters (read) and setters (update) in intra-contract interactions demonstrates the importance of the CRUD pattern.
Let’s get back to our game code. So far, in our Ctontine contract, we have declared the required states and our constructor is already defined. All we are missing is implementing the Ctontine contract methods.
Joining the game
In order to start the game, a player has to call the join() method while sending more than one ether to the Tontine contract. Therefore, in the Ctontine contract, we need to implement this function as follows:
function join() public payable  returns(bool) { require(Tplayer.exist(msg.sender), "player doesn't  exist"); require(msg.value >= 1 ether && Tpension[msg.sender]  == 0, "send higher

    pension");

    Tpension[msg.sender] = msg.value; Tplayer.EditPlayer(msg.sender,  active_players.length); active_players.push(Tplayer.getplayer(msg.sender));  Lindex += (active_players.length - 1); ping_time[msg.sender] = now;

    emit NewActivePlayerEv(msg.sender, now); return true;

    }
Let’s go over this implementation, line by line.
First of all, the join() function is marked as payable to allow the contract to accept ether via standard transactions. It is also defined as external, specifying that the method has to be called from other contracts or via transactions. We made this choice following the game design and because an external function is cheaper than a normal public function.
The join() method implements the game rules. Thus, a player should be able to join the game if the following requirements are met:
- Player should be registered in the Cplayer contract: require(Tplayer.exist(msg.sender), "player doesn't exist");
- Player should send enough money (more than one ether): msg.value >= 1 ether
- Player hasn't joined the ongoing Tontine game before: msg.value >= 1 && Tpension[msg.sender] == 0
If they fulfill the conditions, we save the supplied ether in the Tpension array.
The Tplayer.EditPlayer(msg.sender, active_player.length); line edits the value of the id attribute for the given player. We use this element to keep track of the index of each player in the active player array. That will help us to know which case to delete if we want to remove this player.
Then the active_player.push() function is used to add a new player into the active_player array.
We use a Lindex global state, which sums up the index values of the active players. Why? Because it will help us to know the last surviving player’s index in the active players array.
The ping_time[msg.sender] = now; line initially stores the time when the players join the game as their first ping time.
At the end of the function, we emit an ewActivePlayerEv(msg.sender,now) event to announce the signing of a new player.
So far, within this function, we have introduced a lot of new things related to intra-contract interaction. Let's again take a pause in writing the Ctontine contract and learn some new concepts. You can skip the next two sections if you want to concentrate on building the game.
Calling remote functions
In Solidity, you can call functions either internally or externally. Only the functions of the same contract can be called internally, whereas external functions are called by other contracts.
If you were to call a function from another contract, the EVM uses the CALL instruction, which switches the context, making its state variables inaccessible. In the following sections, we will discover two ways to call a function from another contract.
Option one – using the ABI
As we did in the Ctontine contract, the regular way to interact with other contracts is to call (invoke) a function on a contract object (we borrow here the OOP terminology). For example, we can call a remote function from a remote contract, ContractA , as follows: ContractA.Remotefunction(arguments).
But to be able to make the invocation this way, we need to define (in the same Solidity file) an abstract form of ContractA. For instance, if we have a contract, ContractA, then the code is as follows:
contract ContractA {

    function  f(uint256 a, string s) payable returns (bool) {

    //your code here return true;

    }

    }
If this contract is deployed in the blockchain, let’s say under the 0x123456 address, and we want to call the f() function within a caller contract, ContractB, then we have to include the abstract form of ContractA in the ContractB file, then instantiate ContractA and execute f(). Here is how the ContractB contract file will look:
contract  ContractA {

    function f(uint256 a, string s) payable returns (bool); function h()  payable returns (uint);

    }
  contract ContractB{

    address  ContractAaddress = 0x123456;

    ContractA  ContractAInstance = ContractA(ContractAaddress);
  function g() returns (bool){

    return  ContractAInstance.f(10, "hello");

    }

    }
If we invoke a payable function, we can specify the number of wei, as well as limit the amount of gas available to the invocation using the .gas() and .value() special options, respectively: ContractAInstance.h.value(10).gas(800)();. The parentheses at the end serve to receive the arguments needed to perform the call. If the function doesn’t accept any arguments, we keep them empty.
Option two – using low-level calls
When the called contract doesn't adhere to the ABI, we can't just use ContractAInstance.f(); or ContractA ContractAInstance = ContractA(0x123456) to define a new instance.
In this case, we have to use the special low-level call function, using the following call structure:
contract_address.call(bytes4(sha3("function_name(arguments types)")), parameters_values)
In the previous example, we could call f() with two arguments using ContractAaddress.call(bytes4(keccak256("f(uint256,string)")), 10, ”hello”);.
This is a sort of tedious manual construction of the ABI function signature. However, things are getting better with newer Solidity. Since release 0.4.22, the abi.encode(), abi.encodePacked(), abi.encodeWithSelector(), and abi.encodeWithSignature() global functions have been defined to encode structured data, therefore helping us to build a valid call, as follows:
OneInstance.call(abi.encodeWithSignature("function_name(arguments types)")),parameters_values)
call can be used along with the .gas() and value() methods to adjust the supplied gas and value in the call.
call returns true if the called function executes without exception. Also, it will fire an exception if the call contract does not exist, or if it throws an exception or runs out of gas. If we apply call to a contract without specifying a function name, its fallback will be executed (maybe that's why the fallback function doesn’t have a name).
Using call to send ether
For security reasons, there is a capped stipend of 2,300 gas that applies to internal sends (using the transfer() or send() methods) from one smart contract to another. Therefore, the triggered fallback has a limited amount of gas to operate. However, the call function doesn’t have a similar limitation, which represents a risk for your contract. In order to define the same security measure, you have to set gas to 0 in your calls: contract_address.call.gas(0).value(xyz).
Mind you, the call method or other low-level functions should be used with care as they may cause some security issues if we deal with a malicious contract.
After this long introduction about contract remote calls, let’s get back to our Ctontine contract.
The ping() method
After implementing the join() function, it’s time to define the ping() function, which will allow the player to update their activity, as follows:
function ping() external returns(bool) {  ping_time[msg.sender] = now;

    return true;

    }
There's nothing complex about this code. Each time ping() is called, we will store the current time returned by now as the new ping time. Players will not literally ping the contract as we do in a network, they will only send a transaction invoking the ping method to prove their activity.
The eliminate() method
The game logic enables a player to eliminate another unlucky opponent by triggering the eliminate() method, which we define as follows:
function eliminate(address PlayerAddress) external        returns(bool) { require(now > ping_time[PlayerAddress]  + 1 days);

  delete Tpension[PlayerAddress];

  delete active_players[Tplayer.getplayer(PlayerAddress).id]; Lindex -=  Tplayer.getplayer(PlayerAddress).id;  eliminated_players.push(Tplayer.getplayer(PlayerAddress));  Tplayer.EditPlayer(msg.sender, 0); share_pension(PlayerAddress);

  emit eliminatedPlayerEv(PlayerAddress); return true;

  }
Take a close look, and I’m sure you’ll make sense of this code.
The require(now > ping_time[PlayerAddress] + 1 days); line ensures that we can eliminate only players who didn’t ping the contract within the last 24 hours.
This function will remove the eliminated player from the active player list (active_players) and move it to the eliminated player list (eliminated_players.push). Then we set the player's ID to zero as it has been removed from the active player list. Afterward, we call share_pension(), which will share the balance of the eliminated player between the remaining active players. We end by firing an event, declaring the elimination of the player.
The share_pension() method
As you saw, in the previous function we called share_pension() to share the eliminated player’s deposit. Here’s its implementation:
function share_pension(address user)  internal returns (bool) { uint256  remainingPlayers = remaining_players(); for(uint256 i = 0; i <  active_players.length; i++){
if (active_players[i].Paddress != 0x00)

  Tpension[active_players[i].Paddress] =  Tpension[user] / remaining_players;

  }

  return true;

}
function remaining_players() public view  returns (uint256) { return (active_players.length-eliminated_players.length);

  }

  }
We declare this function internal as it’s intended to be used only within the contract scope. As we can see, share_pension() shares the eliminated players’ balances between the remaining active players. This function has to allocate the Tpension[user]/remaining_players quotient to each active player. However, we are facing a problem here! Have you spotted it?
Standard integer division
Handling the division in the previous scenario is just the same as working with integer divisions, as Ethereum doesn’t adopt floating point numbers. The division would result in a floor of the calculation with the remainder discarded. For example, the division 17/3 equals 5, with the remainder of 2 discarded. To fix this, we create a new method that does the following:
  function  calcul(uint a, uint b, uint precision) public pure returns (uint)

  {

  require(b !=  0);

  return a *  (10 ** (precision)) / b;

  }
Note that the double asterisk, **, is a Solidity operator representing the exponentiation operation. In our example, 10 is the base whereas precision is the exponent.
If we divide 17 by 3 using the calcul() function, and we call the function with a precision of 5 (the number of digits after the decimal point), it will output 566,666, which can be displayed to the player as 5.66666. In this way, we can produce a float using integer division, though it still requires that in the frontend you divide the result by the equivalent value of (10 ** (precision)) to display the floating-point number.
Therefore, in the share_pension() function, we substitute the quotient by performing the following:
Tpension[active_players[i].Paddress] = calcul(Tpension[user], remainingPlayers, 18);
The claimReward method
At the final stage of the game, the last active player can claim their reward by calling
claimReward(), which we define as the following:
 function claimReward() external returns  (bool) { require(remaining_players() == 1);  active_players[Lindex].Paddress.transfer(address(this).balance); return true;

  }
I’m sure the this keyword has caught your attention more than the rest of the code. So what is it?
The this keyword
The this keyword in Solidity is pretty similar to this in OOP, and represents a pointer to the current contract, which is explicitly convertible to an address. Moreover, all contracts inherit the members of address, thus it is possible to query the balance of the current contract using address(this).balance (you'll find this.balance in old code).
As this returns the address of the current contract, we can use it as follows: address ContractAddress = this;.
this is also used to access internally a method declared as external, otherwise the compiler won’t recognize it. In that case, the function will be called through a call message instead of being called directly via jumps.
Great, at this level, we’re nearly done with the game contracts. However, the code should be tested before we start working on the user interface side in our next recipe. I hope you didn’t forget how to use Truffle.
#5 Work with Truffle Unit Testing in Tontine DApp Game
Recap
- Install Truffle and Setup Ganache for Compiling Ethereum Smart Contracts for Tontine DApp Game
- Run Tontine Ethereum DApp Game Contract
- Design Tontine Ethereum DApp Game Interfaces
- Contract Interactions between Ethereum and Solidity via Tontine DApp Game
- Work with Truffle Unit Testing in Tontine DApp Game
- Debugging with Truffle and Ethereum Remix in Tontine DApp Game
- Building Frontend Application for Tontine DApp Game with Drizzle
- Running and Playing Tontine Ethereum DApp Game
Under the hood, Truffle leverages an adapted version of the famous Mochajs unit-testing framework to test Solidity contracts. Consequently, you can write your tests in JavaScript and take advantage of all the patterns Mocha provides. In addition, Truffle enables you to write tests using Solidity directly. In this section, I will opt for starting with JavaScript to implement all of the Tontine test cases, then we will explore how to use Solidity as a testing framework.
Preparing the testing environment
To test our contracts, we need first to check whether they compile properly without any errors. As we did in our previous recipes, open your Terminal and place yourself in the tontine/ folder we created earlier, then compile the contracts using either truffle compile or truffle compile-all.
The second of these will compile all contracts instead of intelligently choosing which contracts need to be compiled. Now, have a look at the console output:
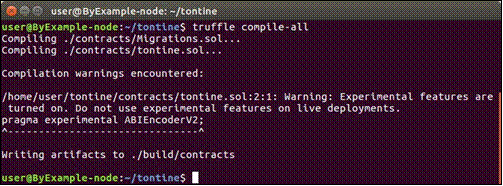
We will get a single, irrelevant warning that we can ignore and advance toward migrating the contract.
Migrating the contracts
In this second step, we need to write a migration file to let Truffle know how to deploy your contract to the blockchain. Go to the migrations/ folder and create a new file called 3_initial_migration.js. Notice the incremented numerical suffix:
var Ctontine = artifacts.require("Ctontine"); var Cplayer = artifacts.require("Cplayer");
module.exports = function(deployer) {  deployer.deploy(Cplayer).then(function() {

    return deployer.deploy(Ctontine,  Cplayer.address);

    }).then(function() { })

    };
In the migration file, the first thing we need to do is get the reference to our contract in JavaScript. This migration script will first deploy the Cplayer contract, then it will pass its address to the constructor of Ctontine to deploy it.
Running Ganache
Before migrating your contract, don't forget to make sure that Ganache is running. If not, keep the same configuration file, truffle.js, as in the earlier example, and run Ganache as we did before: ganache-cli -p 7545.
Preparing the tests
Everything is ready to build our Truffle test.
First off, create a test.js file within Truffle's test/ folder, then paste in the following code:
var Cplayer = artifacts.require("Cplayer"); var Ctontine =  artifacts.require("Ctontine"); contract('Cplayer', function(accounts)  {

    });

    contract('Ctontine',  function(accounts) {

    });
As you guessed, artifacts.require references the contract to use in the test script. Then, for each contract we need to test, we define a contract() function to create a test suite, as follows:
contract(Cplayer, function(accounts) { });
Here, the contract() function is similar to the describe() function in Mocha, which holds a collection of tests. Its first parameter is an array with the accounts coming from Ganache.
Note that every call or transaction you execute from web3.js or Truffle is asynchronous, with the difference being that the first uses promises and web3.js uses callbacks. Either way, while testing, you’re going to be writing plenty of asynchronous code.
Testing addPlayer()
Moving on, it’s time to define our first test. We will check whether the addPlayer() function operates properly. Put the following code inside the first contract function in your test file:
it("..should ADD players", async  () => { let Cp = await Cplayer.new();

    for (let i = 0; i < 3; i++) {

    await Cp.addPlayer("player" + i, 123, { from: accounts[i] });  const P = await Cp.players.call(accounts[i]); assert.equal(P[2], accounts[i],  "player not added");

    }

    });
If you’re not familiar with the Mocha framework, know that it is a function that is actually a test itself, which takes two arguments. The first is a message using natural language to describe our expectation for the test, and the second is a function that holds the body of the test.
In the preceding test, we create a new Cplayer contract and then add three players using the addPlayer() method. As you can see, we use await as we are dealing with an asynchronous call.
The test ends with an assertion test using assert.equal(<current>, <expected>,
<message>);.
Obviously, as its name indicates, this function tests whether two values are equal. If this wasn't the case, it would cause an assertion failure and communicate the message you defined (optionally) as the third argument.
Now, run this first test using truffle test --network my_ganache. Alternatively, you can specify a path to a specific file you want to run, for example,
truffle test ./path/fileName.js --network my_ganache.
Each time you run the test, Truffle will automatically compile and migrate your contract for you. The test script should compile without any errors. Henceforth, you can continue using Truffle for testing each it block we define, or leave it until the end.
Testing findPlayer()
In a single-testing contract function, it is common to have multiple it blocks instead of combining multiple tests in a single it block. This time, we would like to test the findPlayer() function:
 it("..should FIND a player",  async () => { let Cp = await Cplayer.new();

    for (let i = 0; i < 3; i++) {

    await Cp.addPlayer("player" + i, 123, { from: accounts[i] }); const P = await  Cp.findplayer(accounts[i]); assert.equal(P[0], "player" + i,  "player not found");

    }

    });
This is pretty similar to what we did in the previous test. We only changed the test message and the function we tested.
You may have noticed the redundancy (contract creation) between the two previous it blocks. To remove this inconvenience, we can put this redundant code function into the special beforeEach() function in the contract function:
const [firstAccount, secondAccount, thirdAccount] = accounts;
let Cp;
beforeEach(async function() { Cp = await  Cplayer.new();

    });
Consequently, before each test, we instantiate the Cplayer contract, so each test is executed with a clean contract state. We also named three first accounts to avoid using accounts[index]. That way, the test looks cleaner and more elegant.
Testing removePlayer()
Here, we will experiment with something interesting. As you know, in the Cplayer contract, the ability to remove players is restricted to an administrator, which is the deployer's account. The following test will check whether an exception will be raised if a different account tries to call removePlayer() :
it("..Only admin can REMOVE  players", async function() { let error;

    await Cp.addPlayer("player1", 123, { from: secondAccount });  try {

    await Cp.removePlayer(secondAccount, {  from: thirdAccount }); assert.fail();

    } catch (error) {

    const msgexist = error.message.search('revert') >= 0;  assert.ok(msgexist);

    }

    }
As we are expecting an error, we can just use try {...} catch{} blocks to handle the exception.
The test will be successful if the contract returns an error with the 'VM Exception while processing transaction: revert' message. This is because the contract will be deployed with the default account (accounts[0] is the admin), and we then try to remove the player using a different account, accounts[2] (who is not admin).
Within the try block, we use assert.fail() to throw a failure with the error message, and in the catch block, we use assert.ok() to test whether the specific revert keyword exists in the error message.
At this level, we've tested almost all the main functions and behaviors in the Cplayer contract. Now, it's time to test Ctontine.
Testing Ctontine
We start by removing the redundancy in the test block as we did previously for the Cplayer tests. We will create a beforeEach hook, which takes care of the contract's creation and adds three players to the Cplayer instance. All these elements will help us to perform unit tests for the Ctontine contract. Keep in mind that all the Ctontine tests should be defined within the second contract function in the test file. As a result, we add the following code to the Ctontine test suite:
contract('Ctontine',  function(accounts) {

    const [firstAccount, secondAccount, thirdAccount] = accounts; let Cp;

    let Ct;

    beforeEach(async function() { Cp = await  Cplayer.new();

    Ct = await Ctontine.new(Cp.address); for (let i = 0; i < 3; i++) {

    await Cp.AddPlayer("player" + i,  123, { from: accounts[i] });

    }

    });

    });
Testing a payable function
The first function to test in Ctontine will be join(), which is payable. We therefore need to check whether a player registered in Cplayer is able to deposit ether and join the active players list:
it(".. should enable players to join  the game", async () => { await  Ct.join({ from: firstAccount, value: 1 * Ether }); let P1 = await Ct.active_players(0);

    assert.equal(P1[0], "player0",  "Player hasn’t joined the game");

    let CtBalance = await getBalance(Ct.address); assert.equal(CtBalance, 1 *  Ether, "Contract hasn't received the

    deposit");

    });
As you know, by default, the amount sent in a transaction is specified in wei, so if you only put 1 in the value field, it will be considered as 1 wei, which doesn't fulfill the requirement. In addition to this, Truffle doesn't recognise ether as a unit, therefore as a solution, we need to define a global constant at the top of our test file: const Ether = 10 * 18. By using this constant, we will be able to express values directly in ether.
After calling the join() method, we assert whether the player has been added to the active player list by comparing the player’s name stored in the active player list with the name used in the test: assert.equal(P1[0], "player0", "Player hasn’t joined the game");.
We also assert that funds have been successfully deposited by comparing the deposited amount to the contract balance. If the player has successfully joined the game, the contract balance should be 1 ether.
In Truffle’s tests, to get the contract’s balance, we had to use the web3.js method, getBalance(address). In this example, I have encapsulated the getBalance() method in a separate module, defined in a new getBalance.js file:
module.exports.getBalance = function getBalance(address) { return web3.eth.getBalance(address);
};
This is then imported into the test file using const { getBalance } = require("./getBalance");.
Testing events
As you know, events are very useful for the functioning of DApps. Thus, we need to test whether our contract emits them properly. Here's an example of testing the NewActivePlayerEv event:
 it(".. should emit 'NewActivePlayerEv' event        when a player joins the game", async  function() {

    let NewActivePlayerEvtListener = Ct.NewActivePlayerEv(); await Ct.join({  from: firstAccount, value:1 * Ether });

    let proposalAddedLog = await new  Promise((resolve, reject) => NewActivePlayerEvtListener.get((error, log)  => error ? reject(error) :

    resolve(log)));

    assert.equal(proposalAddedLog.length, 1, " event not emitted");  let eventArgs = proposalAddedLog[0].args; assert.equal(eventArgs._address,  firstAccount);

    let time = await Ct.ping_time.call(firstAccount);  assert.equal(eventArgs.time, time.toNumber(), "ping time");

    });
The important part in the preceding code snippet is the following line:
let proposalAddedLog = await new Promise(  (resolve, reject) => NewActivePlayerEvtListener.get((error, log) => error  ? reject(error) :

    resolve(log)));
Here, we create a new Promise to check whether the event was stored in the contract log. The proposalAddedLog object is expected to be an array containing one entry per event, representing the result of get(), which reads all the log entries.
Then we use assert.equal(proposalAddedLog.length, 1); to check whether a new event was stored (log array isn’t empty).
Once we have ensured that an event has been emitted, we assert that the address and
timestamp returned by the event match the player's address and pinging time.
If you’re wondering why we use a toNumber() method, it ensures the result, which is a
BigNumber, is converted into an integer.
Testing claimReward()
Good news! This will be the last test we perform, but also the longest one. Here, we would like to test the procedure for claiming a reward. As we did before, it’s easy to simulate players joining the game, but to eliminate the opponents, we need to wait a day (the game’s rule) without a ping!
It’s silly to wait a day to perform a test, isn't it?
Don’t worry, there's a workaround for this issue. Let’s look at the test:
it(".. should send the reward to the  last active player", async () => { await Ct.join({ from: firstAccount,  value: 1 * Ether });

    await Ct.join({ from: secondAccount, value: 1 * Ether }); await Ct.join({  from: thirdAccount, value: 1 * Ether }); await  increaseTime(DAY + 1);

    await Ct.eliminate(secondAccount, { from: firstAccount }); await  Ct.eliminate(thirdAccount, { from: firstAccount }); let initialBalance =  getBalance(firstAccount).toNumber(); let Nactive = await  Ct.remaining_players.call(); assert.equal(Nactive, 1, "players not  eliminated");

    let finalBalance=getBalance(firstAccount).toNumber(); await  Ct.claimReward({ from: firstAccount }); assert.equal(finalBalance,  initialBalance + 3);

    });
I think you're now able to decipher the preceding test code, except the following line of code: await increaseTime(DAY + 1);.
As its name indicates, this function is used to move Ganache’s clock forward. If you run this test, you’ll get an error as increaseTime() is not yet defined.
Time manipulation
In a separate file, called increaseTime.js, within the test/ directory, define the following module to move time forward for a given duration:
module.exports.increaseTime = function  increaseTime(duration) { const id = Date.now();

    return new Promise((resolve, reject) =>  { web3.currentProvider.sendAsync({

    jsonrpc: "2.0",

    method: "evm_increaseTime", params: [duration],

    id: id

    }, err1 => {

    if (err1) {

    return  reject(err1);

    }

    web3.currentProvider.sendAsync({ jsonrpc:  "2.0",

    method: "evm_mine", id: id + 1

    }, (err2, res) => {

    return err2  ? reject(err2) : resolve(res);

    });

    });

    });

    };
Don’t let this strange chunk of code fool you. It is actually very easy to read and understand, so have a second look.
To understand what's going on, you should know that Ganache provides two nonstandard RPC calls: evm_mine and evm_increaseTime. The former simply forces a block to be mined instantly, whereas the latter jumps forward in time. As you can see, in the earlier code, evm_increaseTime takes one parameter, which is the amount of time to increase in seconds. It will use this literally to instruct Ganache to push the clock forward and help us to perform the claimReward test instantaneously instead of waiting for a whole day.
Once the module is defined, you have to import it into your test file using const { increaseTime } = require("./increaseTime");.
Finally, we also define constant DAY = 3600 * 24; to increase the duration in days easily instead of dealing with seconds.
Running the tests
After writing the game contracts and the tests, let's run our test suite to ensure that we have the expected behavior. For that, we run truffle test --network my_ganache.
The outcome will be a detailed output similar to the following:
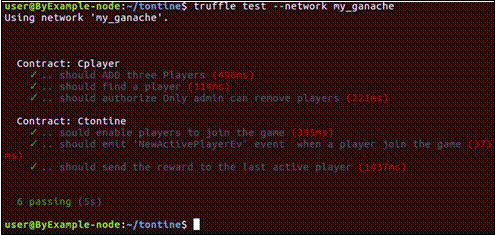
If the tests were successful, you’ll see green checkmarks along with a short description (the it block's description) for each unit test. Otherwise, you’ll get a red failure message indicating the faulty test.
Under the hood, in one shot, Truffle compiles your contracts and runs migrations to deploy the contracts to the network, then runs the tests against the deployed instances.
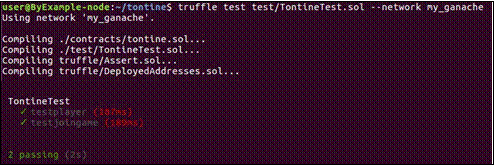
Testing with Solidity
As we mentioned before, Truffle enables us to run unit tests using Solidity as well as JavaScript. In order to start testing with Solidity, create a file called TontineTest.sol (.sol extension not .js) in Truffle’s test/ folder with the following code:
    import "truffle/Assert.sol"; import "../contracts/tontine.sol";

    import "truffle/DeployedAddresses.sol"; contract TontineTest {  }

    This is an empty test  contract, so we start by importing the needed testing libraries, DeployedAddresses.sol and  Assert.sol (created  dynamically at the time of deployment), along with the contract being tested (tontine.sol).
  Let’s go over how to write a Solidity unit test. In the TontineTest contract, define  the following testing methods:
  contract TontineTest {

    uint public initialBalance = 10 ether; Cplayer cplayer_;

    Ctontine  tontine;
  function beforeEach() public {

    cplayer_ = Cplayer(DeployedAddresses.Cplayer()); tontine =  Ctontine(DeployedAddresses.Ctontine());

    }
  function testplayer() public {  cplayer_.AddPlayer("Player1", 1234); bool expected =  cplayer_.exist(this);

    Assert.isTrue(expected, "Player  doesn't exist");

    }
  function testjoingame() public {  cplayer_.AddPlayer("Player1", 1234); uint expectedBalance = 2 ether;  tontine.join.value(2 ether)();

    Assert.equal(expectedBalance,  address(tontine).balance, "Contract balance should be 2 ether");

    }

    }
It's a bit of a long test, but let's look at it after disassembling.
First off, the initialBalance variable indicates to Truffle how much ether to allocate to this test contract on deployment (10 ethers, in our case).
In just the same way as we did in the JavaScript tests, we can define a beforeEach hook as well as beforeAll, afterAll, and afterEach to perform setup and teardown actions before and after each test is run. We also use DeployedAddresses objects to manage the address of the contracts deployed at test time.
In this example, we are performing two unit tests:
- testplayer(): Checks whether a player added using addPlayer() has been successfully added
- testjoingame(): Checks whether the Ctontine contract has accepted funds deposited through the join() method
Similarly to the JavaScript tests, we rely on assertions (ChaiJS) to perform our unit tests. Various testing functions, such as equals(), greaterThan(), isFalse(), and isEqual(), are defined in Truffle’s Assert library.
In the first test, we use the this variable, which represents the address of the current contract. Why? Because when we call the addPlayer() method, the Cplayer contract will see the test contract as the sender. Thus, we add the contract as a player, and then we check whether a player has been created with the same address.
In the second test, we add a player and then call the join() method while also depositing two ethers into the game. Afterward, we check whether the contract balance is equal to the deposited amount.
Run the tests again in the same way we did before: truffle test test/TontineTest.sol --network my_ganache.
In the test output, you should see the tests successfully passed, as follows:
Building a test suite while developing new smart contracts is an absolute necessity. I would suggest looking at the tests provided by the OpenZeppelin framework. You will find their cleanly written and reusable test patterns.
Compared to JavaScript, Solidity presents limited testing features. For example, unlike JavaScript tests, Solidity tests provide us with a single account (contract account), which can be used as the transaction sender.
Hopefully, this recipe helps you get started with your tests. Alright, after validating execution correctness with our tests, let's move on to spot potential bugs with debugging in our next recipe.
#6 Debugging with Truffle and Ethereum Remix in Tontine DApp Game
Recap
- Install Truffle and Setup Ganache for Compiling Ethereum Smart Contracts for Tontine DApp Game
- Run Tontine Ethereum DApp Game Contract
- Design Tontine Ethereum DApp Game Interfaces
- Contract Interactions between Ethereum and Solidity via Tontine DApp Game
- Work with Truffle Unit Testing in Tontine DApp Game
- Debugging with Truffle and Ethereum Remix in Tontine DApp Game
- Building Frontend Application for Tontine DApp Game with Drizzle
- Running and Playing Tontine Ethereum DApp Game
Developers familiar with debugging will find this a welcome relief. Truffle and Remix provide built-in debugging features to help us understand where the code fails. This section provides a general overview of debugging in Truffle and Remix. If you are familiar with debugging using other IDEs, such as Eclipse or NetBeans, you will find Truffle and Remix similarly useful, even though they're less powerful.
Debugging with Truffle
Truffle includes a built-in debugger to debug transactions made against your contracts. It supports elementary debugging operations, such as code-stepping (over, into, out, next, and instruction), breakpoints, and watching expressions.
To try the debugging features, let's intentionally introduce a bug into the Ctontine contract and redeploy it into Ganache. Afterward, we will run the tests and use Truffle’s debugger to detect the source of the error.
First, in the Ctontine contract code, change the first require() statement in the join()
method as follows:
require(!Tplayer.exist(msg.sender));
As you can see, we reversed the required condition by adding an exclamation mark, "!", indicating that the player shouldn’t be registered in the Cplayer contract. This goes against our previous test's logic as we add the testing player before calling each unit test, including a test for the join() method.
Now, if you run the truffle test test/test.js --network my_ganache tests, you will see the following error:

The output shows that we have a serious problem with the Ctontine tests and the VM exception while processing transaction error message isn’t much help in detecting the cause behind it. Let’s chase the bug.
Spotting the error
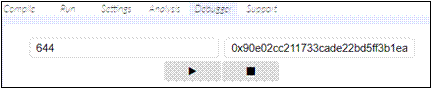
To debug the previous error, copy the transaction ID from ganache-cli:
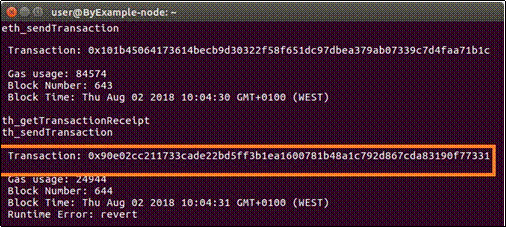
Then feed it as an argument to the truffle debug <tx id> --network my_ganache
debug command.
In this case, we run:
truffle debug 0x90e02cc211733cade22bd5ff3b1ea1600781b48a1c792d867cda83190f773319 -- network my_ganache
Once executed, you’ll enter Truffle's debugging mode, as shown the following screenshot:
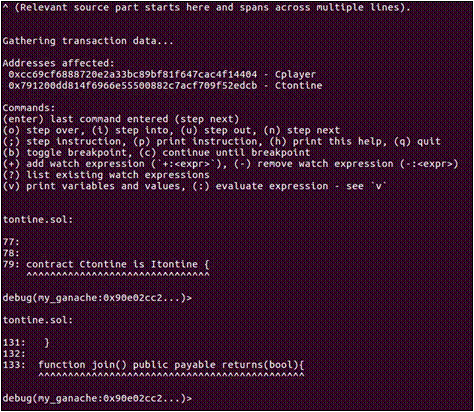
Keep pressing the Enter button to step through the code and trace the execution steps. Finally, the debugger will stop with an error message:

As a result, Truffle's debugger indicates that the exception (error) is raised due to a failed require() statement, as the evaluated expression (!Tplayer.exist(msg.sender)) will definitively always be false. This is because, if you remember, in the join() test we added the player first, therefore the exist() function will be always true, and hence our faulty require() will fail. The important point is that Truffle indicates to us where the code fails with an interesting message, instead of the previous error message generated by the VM.
Breakpoints and watching values
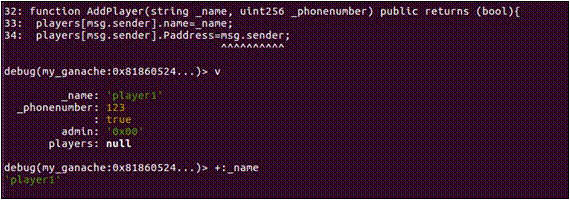
More importantly, Truffle’s debugger console enables you to toggle a breakpoint by pressing b and then pressing c to debug until reaching the breakpoint. Additionally, you can choose a variable (state or local) to watch using +:variable_name or by pressing v at any debugging step.
For example, if we debug the transaction initiated by the first (successful) Cplayer test (the addPlayer() test), we can visualize the values of each variable using the v option, as follows:
Make sure to experiment with all the debugger features introduced earlier. A good start point would be to read Truffle’s documentation.
Now, roll back the changes, and save the contract to try debugging with Remix.
Debugging with Remix
If you’re not a fan of CLI tools, Remix is a good debugging alternative for you. In fact, Remix provides a graphical interface with many more options.
Start and connect Remix to Ganache as we did in the previous recipes. Once connected, you will be able to debug the previous transaction we debugged using Truffle. First of all, we need to activate the debugging mode. There are several ways to achieve that, the easiest way being to browse to the debugger tab in the right-hand panel, and then provide either a transaction hash (transaction index) or a block number in the debugging input:
In Remix's right-hand pane, on the debugging form with several controls, press the play button to start debugging. You’ll get a debugging menu with the views depicted here:
The views are listed as follows:
- Instructions: Lists the executed opcodes
- Solidity Locals: Shows the content of local variables in the current scope
- Solidity State: Displays state variables of the current executing contract
- Step detail: Displays the current step's execution details (remaining gas and VM trace step)
- Stack: Displays the local variables values stored in the stack
- Storage: Displays the contract storage entries(key, value) as shown here:

- Memory: Provides a view into the memory space that is used by the contract
- Call Data: Usually contains a 4-byte method signature followed by serialized arguments
The slider bar at the top (transaction section) helps you advance or roll back the execution of the transaction (debugging) easily to visualize the evolution of the available debugging information.
Below the slider, Remix provides a set of buttons at the top of the toolbar for controlling the execution of the transaction you are debugging:


 Step through a transaction's payload execution using the debugging buttons: Single over back
  , step back , step into , and step over
 You can stop debugging and resume operations at any time using the respective debugging buttons: and
Debugging the previous faulty transaction using the transaction’s ID with Remix debugger boils down to dealing with crude information, including the list of executed opcodes. In this first case, the debugger shows us that the execution ends with a REVERT instruction:
If you follow the JUMP instructions and the values being loaded into the stack, you’ll be able to trace the source of the exception. However, I highly suspect you can't (or don't want to) deal with this hard task, which is why we are proposing an easier alternative in the remainder of this section.
Attaching the debugger to the code
Using Remix’s debugger with only the transaction ID can be a little troublesome for beginners trying to spot where the code breaks, without having the debugger attached to the code. To make the attachment, we need to load the contract code and connect Remix to the new instance you’ve migrated in Ganache.
First, import the contract file from Truffle’s folder, as follows:

Deploy the contract into Ganache using truffle migrate –reset –network my_ganache, then retrieve the contract's address:

Under the Run tab, connect Remix to the deployed Ctontine contract using the At Address button (not Deploy). We then do the same for Cplayer. You’ll end up with two contracts loaded into Remix.
Then, we add three fictional players using addPlayer(). To add different players, change the account indicated in the transaction parameters in the top of the right-hand panel each time and execute the addPlayer() function (by pressing the addPlayer() button):
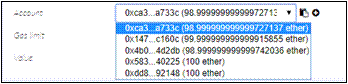
Now that we have three registered players, we can start interacting with the Ctontine contract.
Watching values
Remix provides us with a watch window to observe and inspect contract variables. To use this feature, in the right panel, second tab from the left, fill in the Value input with 1 and ether:
Then make the first player join the Tontine game by pressing the join button. When it completes successfully, change the account and call the join method with zero ether, and you’ll get the following error in the messages output:

Have you noticed the send higher pension message in the output console? If you remember, this message was defined in the require function to show us the reason behind the exception: require(msg.value >= 1 ether && Tpension[msg.sender] == 0, "send higher pension");.
Press the Debug button in the console or go to the Debugger configuration tab to go through the steps!
The Solidity State section will show us that, unlike the first player, the second player wasn’t added successfully, as depicted in the following diagram:
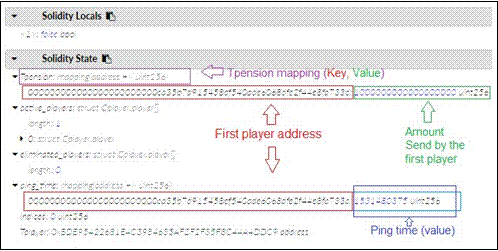
In addition, when the debugging panel loads up, you will see a blue highlight that marks the part of the code being executed as the debugging progresses, which provides precious assistance.
Notice the existence of a warning button under the debugging buttons. Once pressed, it will rethrow the exception and jump directly to the last opcode before the exception happened:
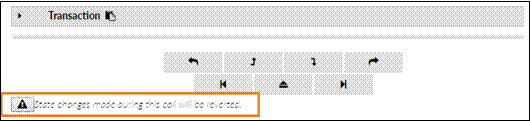
Setting breakpoints
As you know, breakpoints are the most basic and essential feature of reliable debugging. They represent a handy tool to help you examine in detail the execution of a specific section of code. As in other popular IDEs, in Remix breakpoints can be added and removed by clicking on the left margin of a line of code:
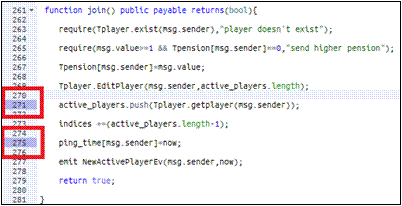
For example, let’s define two debugging breakpoints. Set the first at the line where the player is added to the active players array, and the second at the line where the current timestamp is recorded.
Now, make the second player join the game properly with one ether, then debug the transaction. Once the debugger starts, you can jump directly to your fixed breakpoints using the Jump to previous breakpoint, Jump to next breakpoint, or Jump out debugger buttons:
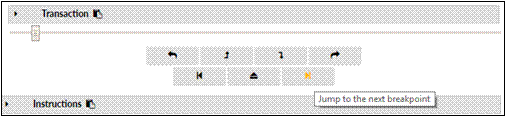
#7 Building Frontend Application for Tontine DApp Game with Drizzle
Recap
- Install Truffle and Setup Ganache for Compiling Ethereum Smart Contracts for Tontine DApp Game
- Run Tontine Ethereum DApp Game Contract
- Design Tontine Ethereum DApp Game Interfaces
- Contract Interactions between Ethereum and Solidity via Tontine DApp Game
- Work with Truffle Unit Testing in Tontine DApp Game
- Debugging with Truffle and Ethereum Remix in Tontine DApp Game
- Building Frontend Application for Tontine DApp Game with Drizzle
- Running and Playing Tontine Ethereum DApp Game
Truffle makes it possible to start a DApp project easily using a collection of delicious Truffle boxes. A box is basically a boilerplate template for giving developers the ability to build robust and adaptable DApps quickly. One of these boxes is the Drizzle box.
In this recipe, we will build a web interface for our game with Drizzle instead of using bare-metal JavaScript and web3.js, as we did in the first round of recipes.
Prerequisites
To get started with Drizzle, it's preferable to have basic knowledge of ReactJS, and will require the installation of the following ingredients:
- MetaMask
- Ganache CLI (a version that supports Websockets)
- Truffle
What is the Drizzle box?
Yes, another tool with a delicious name: Truffle, Ganache, Drizzle, these names make me hungry.
Drizzle is a collection of frontend libraries that make writing DApp frontends easier and more predictable. Drizzle is based on the popular React framework, Redux, which is a predictable state container for JavaScript applications most commonly used with ReactJS for building user interfaces. Thus, it helps you write applications that behave consistently, solving the problems related to state mutation in highly asynchronous and non deterministic environments.
The Drizzle box comes with everything you need to start using smart contracts from a React App. As you’ll see in a moment, Drizzle is easy to use. We just unpack its box and then we can build a DApp in a few steps. You can write a React app from scratch using Drizzle packages, but to save you time and effort, I opt for using the box template and editing its code.
Getting started with the Drizzle box
Let's start by setting up your first Drizzle template.
First, you have to create a new empty folder for the Drizzle box, otherwise Truffle will refuse to download the Drizzle box files. Start by creating a new dedicated folder: mkdir DrizzleTontine.
Then, install the Drizzle box: truffle unbox drizzle.
After a few seconds (two sips of coffee), it should output the following:
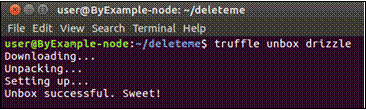
Once the installation is done, you'll get a full DApp demo including sample contracts.
Running the demo
To run the example packed within the Drizzle box, you should already have the local Ganache network running. If not, start Ganache on port 7545: Ganache-cli -p 7545.
As we have a new Truffle project, we need to edit truffle.js, as we have done many times before, to add the my_ganache network. Otherwise, you can edit the development network (port 7545) defined already in truffle.js. If you use the latter option, you won’t need to specify the network using –-network.
The next step is to compile and publish the smart contracts that come with the truffle compile box. Then, publish the compiled smart contracts to the truffle migrate Ganache blockchain.
Starting the web UI
You can run the example that comes with the Drizzle box by running npm run start from within the DrizzleTontine/ directory.
As a result, you'll see the Webpack server launching, and inside the browser, a nice DApp web interface. As well as showing the Drizzle logo, the page will show a few forms to interact with the sample contracts provided by the box, as illustrated in the following screenshot:
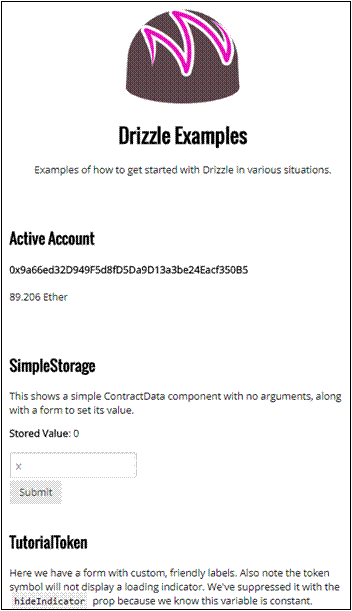
If you don’t have MetaMask already installed, or your account is locked, you’ll see the following message:
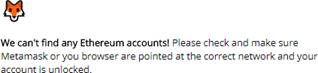
If MetaMask is not already connected to Ganache, you can skip to the Connecting ganache to MetaMask section to fix this issue.
Awesome, isn’t it? In a few steps, you have deployed a full DApp with a clean interface, interacting with three different contracts, without writing a single line of code.
Now, stop the Webpack server using Ctrl + C and let’s customize the box to build our Tontine game user interface.
Hacking the Drizzle box
The previous Drizzle unboxing initiated a Truffle workspace along with a ReactJs project located under the src/ folder. Here are the steps to follow in order to adapt this example to our needs.
First, copy the tontine.sol file into the contracts/ folder and remove the other existing contracts, except for Migration.sol and tontine.sol.
Then edit the 2_deploy_contract file (as we did in the "truffle quick start" and "Truffle unit tests" section), and substitute the existing deployment script with the following:
var Ctontine = artifacts.require("Ctontine"); var Cplayer =  artifacts.require("Cplayer");
  deployer.deploy(Cplayer).then(function()  {

    return  deployer.deploy(Ctontine, Cplayer.address);

    }).then(function()  { })
Next, edit drizzleOptions.js, which is located under the src/ folder, as follows:
import Cplayer from './../build/contracts/Cplayer.json' import Ctontine from './../build/contracts/Ctontine.json'
const drizzleOptions = { web3: {

    block: false, fallback: {

    type: 'ws',

    url:  'ws://127.0.0.1:7545'

    }

    },

    contracts: [ Cplayer, Ctontine ], events: {

    Ctontine: [ 'NewActivePlayerEv',  'EliminatedPlayerEv'

    ],

    },

    polls: {  accounts: 1500 }

    }
export default drizzleOptions;
Here, we define a drizzleOptions object with the following parameters:
- The fallback attribute indicates the URL to use for the web3 connection if no web3 provider, such as MetaMask, is available.
- contracts represents an array of the contract artifacts to interact with.
- In the events option, we set an object consisting of contract names, along an array of the event names we would like to listen for. Furthermore, event names may be replaced with an object containing both eventName and eventOptions, where the eventOptions field defines an event filter. For example, to listen for the eliminatedPlayerEv event from block 0 to the latest we use { eventName: 'eliminatedPlayerEv', eventOptions: { fromBlock: 0 }}
- Finally, polls indicates how often Drizzle will ping the blockchain to synchronize changes in state. polls is set in milliseconds (by default, 3000). In our case, Drizzle will poll every 1.5 seconds.
Once you are done with the drizzleoptions.js editing, move to the src/layout/home directory.
The game’s homepage
Using the default homepage shipped with the Drizzle box, we will set up a web page for our game. Open the src/layouts/home/Home.js file and make the following changes:
 import  React, { Component } from 'react';

    import { AccountData, ContractData, ContractForm } from 'drizzle-react-  components';

    import PropTypes from 'prop-types'; import logo from '../../logo.png';
  class Home extends Component {  constructor(props, context) {

    super(props);

    this.contracts  = context.drizzle.contracts;

    }
  render() {

    return (

    <main className="container">

    <div className="pure-g">

    <div  className="pure-u-1-1 header">

    <img  src={logo} alt="drizzle-logo" />

    <h1>Tontine Game</h1>

    <p>Examples  of how to get started with Drizzle in

    various  situations.</p>

    </div>

    <div  className="pure-u-1-1">

    <h2>Active Account</h2>

    <strong>My details:      </strong>

    <AccountData  accountIndex="0" units="ether"
  precision="3"  />

  </div>

    <div  className="pure-u-1-1">

    <h2>Cplayer  Contract</h2>

    <ContractData

    contract="Cplayer" method="findplayer"

    methodArgs={[this.props.accounts[0]]} />

    <h3>Register</h3>

    <p>Before  you start playing, players should

  register  themselves using AddPlayer from.</p>

    <ContractForm  contract="Cplayer" method="AddPlayer"

    />

    the first time)</p>

    </div>

    <div  className="pure-u-1-1">

    <h2>Ctontine</h2>

    <strong>Last Ping:      </strong>

    <ContractData

    contract="Ctontine" method="ping_time"

    methodArgs={[this.props.accounts[0]]} />

    <strong>Your Game pension:       </strong>

    <ContractData

    contract="Ctontine" method="Tpension"

    methodArgs={[this.props.accounts[0]]} />
  <h3>join  game</h3>

    <p>Press  the button below to join the game (only
  <ContractForm

    contract="Ctontine" method="join" methodArgs={[{value:

    this.context.drizzle.web3.utils.toWei('2','ether'), from:  this.props.accounts[0]}]} />

    <strong>Ping game:      </strong>

    <p>Keep pinging the contract to avoid  being eliminated (ping interval is 1 day)</p>

    <ContractForm

    contract="Ctontine" method="ping" methodArgs={[{from:

    this.props.accounts[0],data:1}]} />

    <h3>Eliminate  an opponent</h3>

    <p>use  this form to eliminate your opponent</p>

    <ContractForm

    contract="Ctontine" method="eliminate"  labels={['Opponent Address']} />

    <h3>Claim your reward</h3>

    <ContractForm  contract="Ctontine"

    method="claimReward"  />

    </div>

    </div>
  <h2>First Active players</h2>

    <ContractData  contract="Ctontine" method="active_players"  methodArgs={"0"} />

    <h2>First Eliminated  players</h2><ContractData  contract="Ctontine" method="eliminated_players"  methodArgs={"0"} />

    </main>

    )

    }

  }
Home.contextTypes = { drizzle: PropTypes.object }; export default Home;
Since this is not a CSS nor a ReactJs recipe, I’m skipping some of the ReactJs explanations and focusing on Drizzle.
Drizzle comes with its own React components, through the drizzle-react-components library, which makes it easier for you to display contract-related information and call the contract methods. In the preceding code, we started by importing three components from Drizzle: AccountData, ContractData, and ContractForm. These components are very powerful, so let's discover what they are used for:
AccountData: Displays the account address and balance for a given index. To use this component, we specify these attributes:
- accountIndex (int): Index of the account to use (zero is the first account)
- units (string): Denomination of the balance (expressed in wei)
- precision (int): Number of digits after the decimal point
For example, the <AccountData accountIndex="0" units="ether" precision="3" /> element will render the first active account’s balance and address:
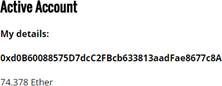
ContractData: Displays the contract call’s output and accepts the following parameters:
- contract(string, required): Name of the contract to call
- method(string, required): Method to call from the contract
- methodArgs(array): Arguments for the contract method call
For example, in the previous code we had the following:
<ContractData contract="Ctontine" method="ping_time" methodArgs={[this.props.accounts[0]]} />
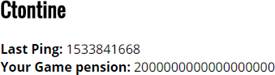
This element will display the ping time value (ping_time) for the specified player (this.props.accounts[0]) from the Ctontine contract. As you can see, there's no such method as ping_time in our contract, but while it's a public state, ContractData element accepts it as a method argument:
ContractForm: Contrary to ContractData, the ContractForm Drizzle component can automatically generate a form to read input and interact with the smart contract.
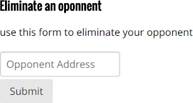
For example, when we use <ContractForm contract="Ctontine" method="eliminate" labels={['Opponent Address']} />, we will generate the following form with one input (as eliminate accepts a single argument). Once submitted, it will call the specified eliminate() method and pass the input value as an argument:
The Drizzle ContractForm element accepts the following parameters:
- contract(string, required): Name of the called contract
- method(string, required): Method whose input will be used to create corresponding form fields
- labels(array): Optional custom labels for the generated form input (following ABI input ordering)
At the time of writing, the ContractForm component doesn't support a value field (maybe soon) to send ether, but there is a workaround for that listed in this GitHub discussion: https://github.com/trufflesuite/drizzle-react-components/issues/17.
One more thing: you may have noticed the use of web3.utils.toWei. Interestingly, Drizzle maintains access to the underlying functionality of web3 1.0, thus you can use all web3.js methods in your React code without needing to initiate a web3 object.
Save all the changes you’ve made so far and now let's try our Drizzle DApp.
Trying the DApp
Good work, you have built your first Drizzle app using the Drizzle box. More importantly, you have set up a great development and deployment environment that will make DApp development and testing even easier.
We're getting close to our final goal of running our drizzle DApp, but there’s one more important step before we try the game: preparing MetaMask. To summarize, Truffle will compile and deploy the contract into Ganache and ensure connectivity with Drizzle, whereas MetaMask will connect the end user to Ganache (blockchain) in order to let a user play and manage their funds.
Connecting Ganache to MetaMask
In the previous round of recipes, we introduced the MetaMask plugin, which allows users to send transactions through the browser without having to install a full node.
To interact with Ganache from the browser, we need to configure MetaMask. For that, in the top-left of MetaMask, you can select Custom RPC. A new dialogue box, titled New RPC URL will show up; here, you should enter http://127.0.0.1:7545 (Ganache's IP and port) and click Save.
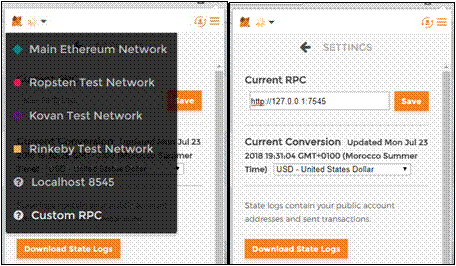
Now that we've connected MetaMask to Ganache, your previous MetaMask accounts will be loaded with 0 ether, which won’t help us to try our DApp. Thankfully, ganache-cli generated a collection of virtual accounts, each with 100 ether. We need to import some of these accounts to be able to interact with the contract. To do that, copy a few private keys from the ganache-cli output and use them in MetaMask to import the corresponding accounts:
In order to import an existing wallet into a MetaMask account, click on the account- switcher icon in the upper-right corner (see the following screenshot) and select Import Account, as shown here:

You can, at any time, switch between imported accounts by using the same account- switcher icon:
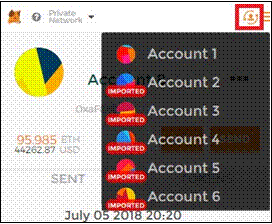
The imported account should appear in the list of accounts and should be marked Imported with a red background. That’s it! You have successfully imported the necessary wallets into MetaMask.
Now let’s run our Tontine DApp in the next recipe.
#8 Running and Playing Tontine DApp Game
Recap
- Install Truffle and Setup Ganache for Compiling Ethereum Smart Contracts for Tontine DApp Game
- Run Tontine Ethereum DApp Game Contract
- Design Tontine Ethereum DApp Game Interfaces
- Contract Interactions between Ethereum and Solidity via Tontine DApp Game
- Work with Truffle Unit Testing in Tontine DApp Game
- Debugging with Truffle and Ethereum Remix in Tontine DApp Game
- Building Frontend Application for Tontine DApp Game with Drizzle
- Running and Playing Tontine Ethereum DApp Game
The compilation and migration processes are the same as we’ve done multiple times already using the following:
truffle compile-all truffle migrate reset
Once the contracts are migrated, let’s taste the fruit of our labor in action. In the Drizzle box folder, run the following:
npm run start
The tontine DApp web page comes up immediately in your web browser, as shown here:

We have got a clean web page with plenty of forms and game details. Eager to play? Let's have some fun!
Showtime – ready to play?
Let’s imagine a scenario where we have two players who are willing to play. We will use a different account for each player from those previously imported into MetaMask.
Afterward, register the first player with details (name, phone number) by filling in the Add
Player form in the game interface, and clicking Submit. A popup will open up in MetaMask, allowing you to submit the transaction. At any time, you can check the transaction status in MetaMask. Wait until it’s marked as Successful:
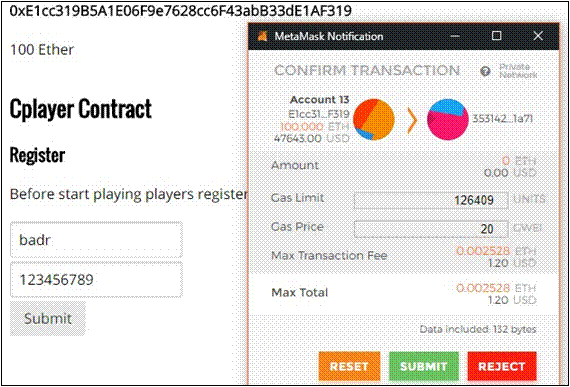
Then, switch between MetaMask accounts and repeat the same operation to add the second player. Note that each player is identified by their wallet address.
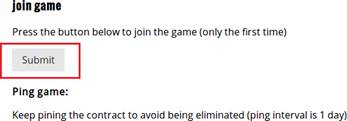
Now, as you have two registered players, you can make them join the Tontine game. Successively, for each account, press the Submit button under join game label:
This time, you’ll get a MetaMask popup showing that you are sending 2 ether to the game (as we fixed that amount in our Drizzle code). Confirm the deposit for both players:
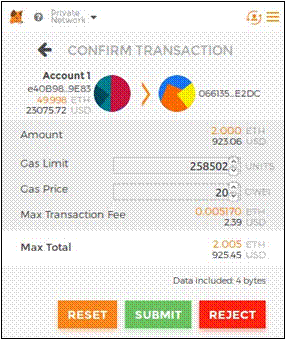
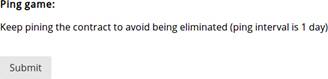
In the same way, you can ping the contract for each player.
I'm sure you’ve noticed that once the join or ping action is dispatched, Drizzle will update the ContractData components (player and Tontine details) automatically without refreshing the whole page as soon the transaction is validated.
As we did in testing, you can increase the time in the trial process to try the elimination feature. From a new Terminal, launch Truffle’s console: truffle console.
This will spawn an interactive console connected to Ganache. We use it to run the following RPC calls:
web3.currentProvider.send({ jsonrpc: "2.0", method:  "evm_increaseTime", params: [90000], id: 1 })

    web3.currentProvider.send({ jsonrpc: '2.0', method: 'evm_mine', params:  [], id:1 })
You can check the block’s timestamp using web3.eth.getBlock("latest").timestamp.
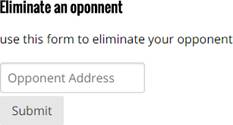
After increasing the time by more than 24 hours, both players can be eliminated. Consider eliminating the second player using the elimination form here:
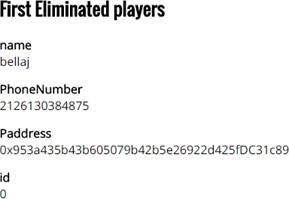
Once the player is eliminated, Drizzle will automatically display the details at the bottom of the web page:
The remaining player should be able to claim and get the due reward (4 ether). During this tryout, we ensured that the Tontine game is working as expected!
As you can see, we have built a minimalist DApp frontend for the game. This choice was intended to give you the chance to elaborate on the design and create a complete frontend for the game. Count it as an exercise for you. You can even build a small Whisper-based chatroom module for the players. For your information, Whisper (not supported by Ganache) is a direct-messaging protocol in the Ethereum network, and it’s fun to work with. I’ll be waiting for your pull requests.
Getting help
Even though we have spent ample time exploring Ethereum and Solidity principles in such a way that you should be able to build DApps, this recipe has its limits and you’ll probably need help at some point. You can register our Ethereum and Solidity programming course for mastering Ethereum blockchain development.
Summary
An important takeaway from 2nd round of recipes is to think twice before deciding to deploy your final contract and release your DApp. It’s good practice to always plan your contract- development process before jumping into the code, along with conducting thorough testing either using JavaScript or Solidity to ensure quality and security. Keep in mind that writing smart contracts is a critical task as you’ll be dealing with real money. You don’t want your project to end up in the blockchain graveyard. The rule of thumb is begin with testing locally on Ganache, and then on a Testnet before going onto the real Mainnet. Besides this, asking other developers to review your code is always a good habit.
To summarize, we built a Tontine game from scratch and learned new things about Solidity and explored how to use plenty of tools, including Truffle, Remix, and Drizzle, to build a full DApp.
Resources
Free Webinars on Blockchain
Here is the list of our free webinars that are highly recommended:
- Hyperledger Fabric for system admin versus developers
- How to harness blockchain for environmental and corporate sustainability
- Review of Initial Coin Offering, Security Token Offering and asset tokenization use cases and best practices
- Blockchain for entrepreneurship- 27 blockchain business use cases
- Hyperledger Fabric for entrepreneurship- 21 blockchain business use cases
Free Courses
Visit our YouTube channel to get access to 40 courses for free.
Articles and Tutorials on Blockchain Technology
If you like to learn more about blockchain technology and how it works, reading the following articles is highly recommended:
- History and Evolution of Blockchain Technology from Bitcoin
- Overview of Blockchain evolution and phases from Ethereum to Hyperledger
- Comprehensive overview and analysis of blockchain use cases in many industries
- Blockchain Crowdfunding Security Token or Initial Coin Offerings
Articles and Tutorials on Ethereum and Solidity
If you like to learn more about blockchain development in Ethereum with Solidity, reading the following articles and tutorials is highly recommended:
- Review of Architecture and Components of Ethereum
- Comprehensive Blockchain Ethereum Developer Guide from Beginner to Advance Level
- How to Write Ethereum Smart Contracts with Solidity in 1 hour
- Review of Architecture and Components of Ethereum
- How Ethereum Manages Accounts
- How Ethereum Manages Transactions
- How Smart Contracts Work in Ethereum
- How Ether and Gas Work in Ethereum
- How Ethereum Virtual Machine works
- How address and wallet work in Ethereum
- How mining works in Ethereum
- List of Tools and Technologies in Ethereum Ecosystem
- Review of challenges in distributed systems
- Review of Cap Theorem in Distributed Systems
- Horizontal Scaling versus Vertical Scaling in Distributed Systems
- How to Scale up Ethereum Blockchain Applications
- Review of scaling solutions for Ethereum
- How to Manage Ethereum State Channel with Raiden
- How Plasma Chains Work in Ethereum
- How Sharding and Gasper work in Ethereum
- How Proof-of-Stack Consensus Works in Ethereum
- A roadmap for Implementing Ethereum 2.0
- How to work with Decentralized Data and Content Storage in Ethereum
- How Decentralized Messaging with Whisper Works in Ethereum
- Review of Infura for Ethereum Development
- Review of Infura Ethereum API
- How to Use Remix with Infura for Ethereum Development
- How Ethereum Client API Works
- How Ethereum IPFS Storage Works
- How to Install and Start Ethereum IPFS Storage
- How to Run Ethereum IPFS Storage
- How to Work with Ethereum Swarm Storage
- How to Install Ethereum Swarm Storage
- How to Handle Ethereum Messages with Whisper
- Review of Popular Ethereum Smart Contract Libraries
- Review of Private and Permissioned blockchain
- How to Set up a Local Private Ethereum Blockchain
- How to Run Geth on a Local Private Ethereum Blockchain
- How to Build a Local Private Ethereum Blockchain with Mining
- How to Run Geth on a Local Private Ethereum Blockchain with Mining
- How to Create an Account on a Local Private Ethereum Blockchain
- How to Use Ethereum Optional Flags with New Chains
- Review of Ethereum Options for Development and Testing
- Review of Ethereum Developer Chain Options
- Review of Ethereum API and Console Options
- Review of Ethereum Networking Options
- Review of Ethereum Transaction Pool Options
- Review of Challenges for Ethereum Blockchain Development
- UI/UX and Design Thinking for Ethereum Blockchain Development
- Review of Ethereum Governance for Ethereum Blockchain Development
- Review of Government Regulations for Ethereum Blockchain Development
- Review of Mainstream Adoption for Ethereum Blockchain Development
- Review of Ethereum Tools and Infrastructure
- Review of Ethereum Tools and Frameworks
- Review of 100 DApps that Run on Ethereum Network
- Ethereum and Know-Your-Customer Requirements
- Integration of Ethereum with AI, ML and IoT
Articles and Tutorials on Hyperledger Family
If you like to learn more about blockchain development with Hyperledger, reading the following articles and tutorials is highly recommended:
- Introduction to Hyperledger Architecture, Projects, Tools and Libraries
- Complete Review of Hyperledger Fabric Architecture and Components
- Hyperledger Fabric for System Administers versus Developers
- How to use Prometheus and Grafana to monitor Hyperledger Fabric
- Essential Hyperledger Sawtooth Features for Enterprise Blockchain Developers
- Blockchain Developer Guide- How to Install Hyperledger Fabric on AWS
- Blockchain Developer Guide- How to Install and work with Hyperledger Sawtooth
- Blockchain Developer Guide- How to Install Hyperledger Burrow on AWS
- Blockchain Developer Guide- How to Install Hyperledger Iroha on AWS
- Blockchain Developer Guide- How to Install Hyperledger Indy and Indy CLI on AWS
- Blockchain Developer Guide- How to Install Hyperledger Seth and Docker on AWS
- Blockchain Developer Guide- How to Configure Hyperledger Sawtooth Validator and REST API on AWS
- Blockchain Developer Guide- How to Build Transaction Processor as a Service and Python Egg for Hyperledger Sawtooth
- Blockchain Developer Guide- How to Deploy Ethereum Smart Contracts with Hyperledger Burrow
- Blockchain Developer Guide- How to Create Cryptocurrency Using Hyperledger Iroha CLI
- Blockchain Developer Guide- How to Explore Hyperledger Indy Command Line Interface
- Blockchain Developer Guide- Comprehensive Blockchain Hyperledger Developer Guide from Beginner to Advance Level
- Introduction to Hyperledger Sawtooth Blockchain Development
Articles and Tutorials on R3 Corda
If you like to learn more about blockchain development on Corda , reading the following articles and tutorials is highly recommended:
Articles and Tutorials on Other Blockchain Platforms
If you like to learn more about blockchain development in other platforms, reading the following articles and tutorials is highly recommended: