Develop advance webcam site using Peer.JS and Peerserver with Express.JS
Recipe ID: hsts-r52
Self-paced training
We offer HTML5, CSS3, JavaScript,Bootstrap, Angular.JS, WordPress Node.JS, React.JS, Joomla, Drupal, Vue.JS and more classes in self-paced video format starting at $60. Click here to learn more and register. For complete self-paced web design training, visit our Web design and development bundle page.
Recipe Overview
In our previous article, we learned about how to use advance js and webRTC for cross browser communications in real time. The best way to master MediaStream and PeerJS is by building real-world applications, which is what we will do in this tutorial. A chatroulette is a website that pairs random site visitors together for webcam and text-based conversation. Discussing how to build a chatroulette will help us to study PeerJS and PeerServer in depth, as it requires us to integrate PeerServer with Express. We will also add media controls to our site in order to pause/resume local MediaStream and allow the user to choose their desired microphone/webcam, which will help us to study MediaStream even more in depth. We will be actually creating a chatroulette that only allows the users of a particular country to chat, which would require an extra step of verification before connecting to the PeerServer; therefore, taking us even deeper into the integration of PeerServer into Express.
In this tutorial, we will cover the following topics:
- Running your own instance of PeerServer
- Creating a custom PeerServer
- Integrating PeerServer with Express
- Verify users for connecting to PeerServer
- Finding the IP address and country of a user connected to the server
- Allowing the user to use a microphone and webcam directly on the webpage
- Discussing the requirements for building a completely working chatroulette
Creating your own PeerServer
Before we start building a chatroulette, let's see how to run our own instance of PeerServer.
PeerServer is available as an npm package on npm cloud. Let's create a custom PeerServer and use it with the PeerJS application that we built in our previous tutorial.
First create a directory named Custom-PeerServer and place app.js and package. json files in it.
In the package.json file, place the following code and run the npm install
command to download the PeerServer package:
{
"name": "Custom-PeerServer", "dependencies": {
"peer": "0.2.8",
"express": "4.13.3"
}
}
At the time of writing, the latest version of PeerServer is 0.2.8. Here, we will also download the express package, as we will need to demonstrate how to integrate PeerServer with Express.
PeerServer package provides a library to create a custom PeerServer or integrate PeerServer with Express and also an executable file to directly create our own instance of PeerServer without any customization.
Run PeerServer from shell
If you want to directly run your own instance of PeerServer from shell without any customization, then run the following command in the Custom-PeerServer/node_ modules/peer/bin directory:
./peerjs –port 8080
It should now print the following command:
Started PeerServer on ::, port: 8080, path: / (v. 0.2.8)
This confirms that PeerServer is running. To test whether the PeerServer instance is working or not, go to the index.html file of the application that we created in our previous tutorial and replace the following code:
peer = new Peer(id, {key: ""});
The preceding code will be replaced with the following code:
peer = new Peer(id, {host: "localhost", port: 8080});
Now run the application and it should work as usual.
Using PeerServer library
PeerServer library is used to create a custom PeerServer. The PeerServer library also allows us to integrate PeerServer with the Express server.
Creating custom PeerServer
Here is an example code that demonstrates how to create your own custom PeerServer. Place the following code in the app.js file and run the node app.js command to start the server:
var PeerServer = require("peer").PeerServer; var server = PeerServer({port: 8080});
server.on("connection", function(id) {
console.log(id + " has connected to the PeerServer");
});
server.on("disconnect", function(id) {
console.log(id + " has disconnected from the PeerServer");
});
Here, the first two lines of the code create the custom PeerServer. We then attached event handlers that will be triggered when a user connects or disconnects from PeerServer. A custom PeerServer doesn't provide an API to check whether a peer is allowed to connect to PeerServer or not. It just allows us to do something after the peer is connected or when the peer disconnects.
To test whether the custom PeerServer is working or not, go to the index.html file of the application that we created in the previous tutorial and replace the following code:
peer = new Peer(id, {key: ""});
The preceding code will be replaced with the following code:
peer = new Peer(id, {host: "localhost", port: 8080});
Now run the application and it should work as usual.
Integrating PeerServer with the Express server
We can also integrate PeerServer with the Express server, that is, a particular path of the Express server will provide the signaling service. The main advantage of
integrating PeerServer with the Express server is that we can check whether a peer is allowed to connect to PeerServer or not, and if it is not allowed, then we can stop the peer from using it.
Here is an example code that demonstrates how to integrate PeerServer with the Express server. Place the following code in the app.js file and run the node app.js command to start the server:
var express = require("express"); var app = express();
var server = app.listen(8080);
app.use("/signaling", function(httpRequest, httpResponse, next){
//check whether peer is allowed to connect or not.
next();
});
var ExpressPeerServer = require("peer").ExpressPeerServer(server,
{debug: true});
app.use("/signaling", ExpressPeerServer); ExpressPeerServer.on("connection", function(id){
});
ExpressPeerServer.on("disconnect", function(id){
});
Here we are using a middleware provided by the PeerServer library to integrate PeerServer with Express. Here, PeerServer is made available on the /signaling path. You can use any path you want to.
The PeerServer library doesn't provide any way to check whether the peer is allowed to connect to PeerServer or not, so we are using our own technique, that is, we are attaching another middleware on top of the ExpressPeerServer
middleware, which performs this check. Although this technique may seem fine, if our custom middleware stops the request from proceeding further, then PeerServer fires the connection and disconnect events and destroys the Peer instance
on the frontend.
Creating a chatroulette
The chatroulette that we will build is only for people residing in India, that is, a peer cannot connect to the PeerServer if the IP address of the peer doesn't resolve to India. We added this filter to make the website a little more complex to code so that you can learn how to check whether a user is allowed to connect to PeerServer or not.
We will use a single server that will serve webpages and also act as a PeerServer, that is, we will integrate PeerServer with the Express server.
We won't get into designing the frontend of our chatroulette. We will only be concentrating on building the architecture and functionalities.
The exercise files for this tutorial contain two directories: Chatroulette and Custom-PeerServer. In the Chatroulette directory, there are two directories: Initial and Final. In the Final directory, you will find the complete chatroulette source code. In the Initial directory, you will only find the HTML code for our chatroulette. The Initial directory is to help you quickly get started with building the chatroulette.
You will place the code related to the frontend functionality of the site in the Initial/public/js/main.js file and you will place the code related to the server side functionality in the Initial/app.js file.
Building the backend
Our site will basically contain three URL end points: a root path for serving the home page, the /find path to find the ID of a free user for chatting, and finally the /signaling path that serves as the end point for PeerServer.
Every user will have a unique ID that is generated by PeerServer. For a user to retrieve the ID of another free user using the /find URL, they must be first be connected to PeerServer.
The server will maintain two different arrays, that is, the first array contains IDs of the users connected to PeerServer and the second array contains IDs of the users that need a partner to chat.
Let's get started with building our backend. Place the following code in the app.js
file to create our web server and serve the home page of our site:
var express = require("express"); var app = express();
app.use(express.static( dirname + "/public")); app.get("/", function(httpRequest, httpResponse, next){
httpResponse.sendFile( dirname + "/public/html/index.html");
})
var server = app.listen(8080);
Here we are serving the index.html file as our home page. Run the node app.js command to start the server. I am assuming that you are running node.js on the localhost, so open the http://localhost:8080/ URL on the browser to see the home page. The home page should look similar to the following image:
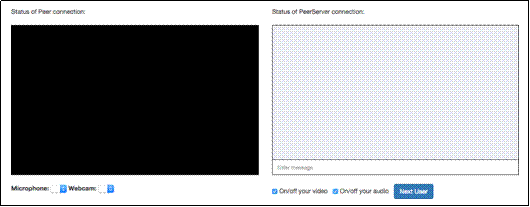
The following are the different elements of the home page:
- At the top of the home page, we will display the status of the PeerServer
connection, DataConnection, and MediaConnection.
- Then we will display a video element and message box. MediaStream of the remote peer will be rendered on the video element.
- Then we have drop-down boxes for the user to select a microphone and webcam that they want to use if they have multiple microphones or webcams connected to their computer.
- Then we have checkboxes that allow the users to pause or resume their audio and video.
- Finally, we have a button that allows the user to disconnect from the current user and chat with another user.
Every interactive element in the HTML page has an ID associated with it. While coding the frontend of the website, we will be using their IDs to get their reference.
Now let's create our signaling server. Here is the code for this. Place it in the app.js file:
var requestIp = require("request-ip"); var geoip = require("geoip-lite");
app.use("/signaling", function(httpRequest, httpResponse, next){ var clientIp = requestIp.getClientIp(httpRequest);
var geo = geoip.lookup(clientIp);
if(geo != null)
{
if(geo.country == "IN")
{
next();
}
else
{
httpResponse.end();
}
}
else
{
next();
}
});
var ExpressPeerServer = require("peer").ExpressPeerServer(server); app.use("/signaling", ExpressPeerServer);
var connected_users = [];
ExpressPeerServer.on("connection", function(id){ var idx = connected_users.indexOf(id);
if(idx === -1) //only add id if it's not in the array yet
{
connected_users.push(id);
}
});
ExpressPeerServer.on("disconnect", function(id){ var idx = connected_users.indexOf(id);
if(idx !== -1)
{
connected_users.splice(idx, 1);
}
idx = waiting_peers.indexOf(id); if(idx !== -1)
{
waiting_peers.splice(idx, 1);
}
});
The following is how the code works:
- Before the user can connect to PeerServer, we will find the country to which the IP address of the user belongs. We will find the IP address using the request-ip module and resolve the IP address to the country using the geoip-lite module. If the country is IN or the country name couldn't be resolved, then we will allow the user to connect to PeerServer by triggering the next middleware, otherwise we will stop them by sending an
empty response.
- When a user connects to PeerServer, we will add the ID of the user in the connected_users array that maintains a list IDs if the users that are connected to PeerServer. Similarly, when the user disconnects from the PeerServer, we will remove the ID of the user from the connected_users array.
Now let's define route for the /find path using which a user can find another user who is free to chat. The following is the code for this. Place this code in the app.js file:
var waiting_peers = [];
app.get("/find", function(httpRequest, httpResponse, next){ var id = httpRequest.query.id; if(connected_users.indexOf(id) !== -1)
{
var idx = waiting_peers.indexOf(id); if(idx === -1)
{
waiting_peers.push(id);
}
if(waiting_peers.length > 1)
{
waiting_peers.splice(idx, 1);
var user_found = waiting_peers[0]; waiting_peers.splice(0, 1); httpResponse.send(user_found);
}
else
{
httpResponse.status(404).send("Not found");
}
}
else
{
httpResponse.status(404).send("Not found");
}
})
Here is how the code works:
- The waiting_users array holds the IDs of the users who are free and looking for a partner to chat to.
- When a user makes a request to the /find path, the route handler first checks whether the user is connected to PeerServer or not by checking whether the user ID is present in the connected_users array.
- If the user is not connected to PeerServer, then it sends an HTTP 404 error. If the user is connected to PeerServer, then it checks whether the user's ID is present in the waiting_list array. If not, it adds in the array and proceeds.
- Now it checks whether any other user ID is also present in the waiting_list array, and if yes, then it sends the first user ID in the list and then removes all user IDs from the waiting_list array. If it doesn't find any other user ID in the waiting_list array, then it simply sends 404 error.
Now we are done building the backend of our website. Before we get into building the frontend of our site, make sure that you restart the server with the latest code.
Building the frontend
First of all, as soon as the home page loads, we need to find the microphones and webcams connected to the user computer and list them so that the user can choose the desired device. The following is the code to do this. Place this code in the main. js file:
window.addEventListener("load", function(){ MediaStreamTrack.getSources(function(devices){
var audioCount = 1; var videoCount = 1;
for(var count = 0; count < devices.length; count++)
{
if(devices[count].kind == "audio")
{
var name = "";
if(devices[count].label == "")
{
name = "Microphone " + audioCount; audioCount++;
}
else
{
name = devices[count].label;
}
document.getElementById("audioInput").innerHTML = document.getElementById("audioInput").innerHTML + "<option value='" + devices[count].id + "'>" + name + "</option>";
}
else if(devices[count].kind == "video")
{
var name = "";
if(devices[count].label == "")
{
name = "Webcam " + videoCount; videoCount++;
}
else
{
name = devices[count].label;
}
}
});
});
document.getElementById("videoInput").innerHTML = document.getElementById("videoInput").innerHTML + "<option value='" + devices[count].id + "'>" + name + "</option>";
}
Here we are retrieving the audio and video input devices using MediaStream. getSources and populating the <select> tags so that the user can choose an option.
As soon as the home page loads, we also need to create a Peer instance. Here is the code to do this. Place this code in the main.js file:
var peer = null; var dc = null; var mc = null; var ms = null; var rms = null;
window.addEventListener("load", function(){
peer = new Peer({host: "localhost", port: 8080, path: "/signaling", debug: true});
peer.on("disconnected", function(){
var interval = setInterval(function(){ if(peer.open == true || peer.destroyed == true)
{
clearInterval(interval);
}
else
{
peer.reconnect();
}
}, 4000)
})
peer.on("connection", function(dataConnection){ if(dc == null || dc.open == false)
{
dc = dataConnection;
dc.on("data", function(data){ document.getElementById("messages").innerHTML = document.getElementById("messages").innerHTML + "<li><span class='right'>" + data + "</span><div
class='clear'></div></li> ";
document.getElementById("messages-container").scrollTop = document.getElementById("messages- container").scrollHeight;
})
dc.on("close", function(){ document.getElementById("messages").innerHTML = "";
})
}
else
{
dataConnection.close();
}
})
peer.on("call", function(mediaConnection){ if(mc == null || mc.open == false)
{
mc = mediaConnection;
navigator.getUserMedia = navigator.getUserMedia || navigator.webkitGetUserMedia || navigator.mozGetUserMedia; navigator.getUserMedia({video: true, audio: true}, function(mediaStream) {
ms = mediaStream; mc.answer(mediaStream);
mc.on("stream", function(remoteStream){ rms = remoteStream;
document.getElementById("peerVideo").setAttribute("src", URL.createObjectURL(remoteStream));
document.getElementById("peerVideo").play();
})
}, function(e){ alert("An error occured while retrieving webcam and microphone stream"); })
}
else
{
mediaConnection.close();
}
})
});
Here is how the code works:
- First we declared five global variables. peer will hold reference for the Peer instance, dc will hold reference for DataConnection, mc will hold reference for MediaConnection, ms will hold reference for the local MediaStream, and rms will hold reference for the remote MediaStream.
- Then, as soon as the page finished loading, we connected to PeerServer, creating a Peer instance and attaching event handlers for the disconnected, connection, and call event handlers.
- Then we made sure that in case a peer gets disconnected from PeerServer due to some reason, then it automatically tries to connect to PeerServer.
- If another peer tries to establish DataConnection with us, then we will only accept it if there is no other DataConnection currently established, otherwise we will reject it. After accepting DataConnection, we attached the event handlers for the data and close events to print the incoming messages in the chat box, and clear all messages in the chat box if DataConnection is closed.
- Similarly, if another peer tries to establish MediaConnection with us, we will only accept it if there is no other MediaConnection currently established, otherwise we will reject it. After accepting the MediaConnection, we
will attach the event handler for the stream event so that when remote
MediaStream arrives, we can display it.
In the preceding code, we are waiting for another peer to establish DataConnection
and MediaConnection with us.
Now let's write a code to find a free peer and establish DataConnection and MediaConnection with it. The following is the code for this. Place this code in the main.js file:
function ajaxRequestObject()
{
var request; if(window.XMLHttpRequest)
{
request = new XMLHttpRequest();
}
else if(window.ActiveXObject)
{
try
{
request = new ActiveXObject('Msxml2.XMLHTTP');
}
catch (e)
{
request = new ActiveXObject('Microsoft.XMLHTTP');
}
}
return request;
}
function connectToNextPeer()
{
var request = ajaxRequestObject(); var url = "/find?id=" + peer.id; request.open("GET", url);
request.addEventListener("load", function(){ if(request.readyState === 4)
{
if(request.status === 200)
{
dc = peer.connect(request.responseText, {reliable: true, ordered: true});
dc.on("data", function(data){ document.getElementById("messages").innerHTML = document.getElementById("messages").innerHTML +
"<li><span class='right'>" + data + "</span><div class='clear'></div></li>"; document.getElementById("messages-container").scrollTop
= document.getElementById("messages-
container").scrollHeight;
})
dc.on("close", function(){ document.getElementById("messages").innerHTML = "";
})
navigator.getUserMedia = navigator.getUserMedia || navigator.webkitGetUserMedia || navigator.mozGetUserMedia;
var audioInputID = document.getElementById("audioInput")
.options[document. getElementById("audioInput").selectedIndex].value; var videoInputID =
document.getElementById("videoInput").options[document.
getElementById("videoInput").selectedIndex].value;
navigator.getUserMedia({video: {mandatory: {sourceId: videoInputID}}, audio: {mandatory: {sourceId: audioInputID}}}, function(mediaStream) {
ms = mediaStream;
if(document.getElementById("audioToggle").checked)
{
var tracks = ms.getAudioTracks(); if(document.getElementById("audioToggle").checked)
{
tracks[0].enabled = true;
}
else
{
tracks[0].enabled = false;
}
}
if(document.getElementById("videoToggle").checked)
{
var tracks = ms.getVideoTracks(); if(document.getElementById("videoToggle").checked)
{
tracks[0].enabled = true;
}
else
{
tracks[0].enabled = false;
}
}
mc = peer.call(request.responseText, ms);
mc.on("stream", function(remoteStream){ rms = remoteStream; document.getElementById("peerVideo"). setAttribute("src", URL.createObjectURL(remoteStream));
document.getElementById("peerVideo").play();
})
}, function(e){ alert("An error occured while retrieving webcam and microphone stream"); });
}
}
}, false);
request.send(null);
}
function communication()
{
if(peer != null && peer.disconnected == false && peer.destroyed
== false)
{
if(dc == null || mc == null || dc.open == false || mc.open == false)
{
connectToNextPeer();
}
}
}
setInterval(communication, 4000);
This code is long but easy to understand. Here is how the code works:
- First we defined a ajaxRequestObject() function that just returns an AJAX object and hides browser differences by creating an AJAX object.
- Then we defined the connectToNextPeer() method that makes requests for a free ID from the /next path, and if found, it establishes DataConnection and MediaConnection with this peer. It also attaches the necessary event handlers that are same as the previous code.
- While retrieving MediaStream, it uses the device selected by the user in the dropdown.
- Before calling the other peer, it sets the enabled property to true or false, depending on whether the checkbox is checked or not respectively.
- Finally, we set a timer that calls the connectToNext() peer once in every four second if the peer is connected to PeerServer, and MediaConnection or DataConnection is currently not established with another peer.
Now we need to write code to send the message to a connected peer when the user presses the Enter key on the text input fields of the message box. Here is the code to do this. Place this code in the main.js file:
document.getElementById("message-input- box").addEventListener("keypress", function(){
if(dc != null && dc.open == true)
{
var key = window.event.keyCode; if (key == 13)
{
var message = document.getElementById("message-input- box").value;
document.getElementById("message-input-box").value = ""; dc.send(message); document.getElementById("messages").innerHTML = document.getElementById("messages").innerHTML + "<li><span class='left'>" + message + "</span><div class='clear'></div></li> "; document.getElementById("messages-container").scrollTop = document.getElementById("messages-container").scrollHeight;
}
else
{
return;
}
}
})
Here, at first, we are checking whether DataConnection is established or not. If DataConnection is currently established, then we will send a message to the connected peer and also display the message in the message box.
Now we need to write the code to pause or resume audio and video when the user toggles the checkboxes. The following is the code to do this. Place this code in the main.js file:
document.getElementById("videoToggle").addEventListener("click", function(){
if(ms !== null)
{
var tracks = ms.getVideoTracks();
if(document.getElementById("videoToggle").checked)
{
tracks[0].enabled = true;
}
else
{
}
});
tracks[0].enabled = false;
}
document.getElementById("audioToggle").addEventListener("click", function(){
if(ms !== null)
{
var tracks = ms.getAudioTracks();
if(document.getElementById("audioToggle").checked)
{
tracks[0].enabled = true;
}
else
{
}
});
Here we are achieving this functionality by assigning true or false to the enabled property of the tracks.
We need to close MediaConnection and DataConnection and find another user for chatting when the user clicks on the Next User button. The following is the code to do this. Place this code in the main.js file:
document.getElementById("next").addEventListener("click", function(){
if(mc != null)
{
mc.close();
}
if(dc != null)
{
dc.close();
}
connectToNextPeer();
})
If there is any MediaConnection or DataConnection currently established, then we are closing it. Then we will call the connectToNextPeer() method to establish MediaConnection and DataConnection.
Now we finally need to display the status of the peer-to-peer connection and
PeerServer connection. Here is the code to do this. Place this code in the main.js file:
setInterval(function(){
if(dc == null || mc == null || dc.open == false || mc.open == false)
{
document.getElementById("peerStatus").innerHTML = "Waiting for a free peer";
}
else
{
document.getElementById("peerStatus").innerHTML = "Connected to a peer";
}
if(peer != null && peer.disconnected == false && peer.destroyed
== false)
{
document.getElementById("peerServerStatus").innerHTML = "Connected to PeerServer";
}
else
{
document.getElementById("peerServerStatus").innerHTML = "Not connected to PeerServer";
}
}, 4000);
Here we are checking and updating the status every 4 seconds.
Testing the website
To test the chatroulette website we just created, first make sure that the server is running and then open the http://localhost:8080/ URL in two different tabs, browsers, or devices.
Now you will see that both of them automatically get connected and are able to chat with each other.
Summary
In this tutorial, we saw how to build a chatroulette using our own instance of PeerServer that is integrated with Express. The website we build had almost all the features that a chatroulette should have. You can now add features such as screen sharing, connecting users of particular a gender with each other, connecting users of a particular age, integrating captcha to prevent spam, and other features of your choice.
At the time of writing, the WebRTC team is working on an API that allows you to retrieve a stream from a screen for screen sharing. As this API is still under development, you can use browser plugins to retrieve a stream from a screen. You can find more about retrieving a stream from a screen using the plugins at https://www.webrtc-experiment.com/Pluginfree-Screen-Sharing/.
Here are related articles if you wish to learn more advance topics for web development:
Best practices for securing and scaling Node.JS applications
Comprehensive overview of Angular 2 architecture and features
How Bootstrap 4 extensible content containers or Cards work
Comprehensive guide for migration from monolithic to microservices architecture
Comprehensive overview of Bootstrap 4 features for user interface customizations
Intro to functional reactive programming for advance js web development
Using advance js and webrtc for cross browser communications in real time
Intro to real-time bidirectional communications between browsers and webSocket servers
Junior or senior web developers can also explore career opportunities around blockchain development by reading below articles:
Blockchain Developer Guide- Comprehensive Blockchain Ethereum Developer Guide from Beginner to Advance Level
Blockchain Developer Guide- Comprehensive Blockchain Hyperledger Developer Guide from Beginner to Advance Level
Here are more hands-on recipes for advance web development:
Build advance single page application with Angular and Bootstrap
Develop microservices with monolithic core via advance Node.JS
Develop server-side applications using microservices with Seneca.JS
Advance UI development with JS MVC framework and react
Develop advance JavaScript applications with functional reactive programming
Develop advance bidirectional communication site with websockets and Express.JS
This tutorial is developed by Narayan Prusty who is our senior Blockchain instructor.
Related Training Courses
Hands-on Node.JS, MongoDB and Express.js Training
Advance JavaScript, jQuery Using JSON and Ajax
Developing Web Applications Using Angular.JS
Design websites with JavaScript React in 30 hours
Blockchain Certified Solution Architect in 30 hours
Advance JavaScript, jQuery Using JSON and Ajax
Introduction to Python Programming
Object Oriented Programming with UML
Private and Custom Tutoring
We provide private tutoring classes online and offline (at our DC site or your preferred location) with custom curriculum for almost all of our classes for $50 per hour online or $75 per hour in DC. Give us a call or submit our private tutoring registration form to discuss your needs.